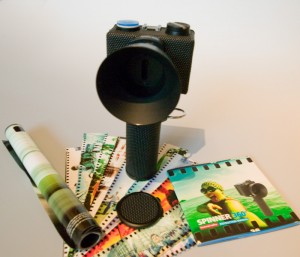
 When I first heard about the Lomography Spinner 360, I knew I had to have one. I’ve been racking my brains on how they’ve made this marvel of 360 degree photography a reality without this being a “pro camera”.
With a rather sharp retail price of £110, this isn’t just a throwaway toy camera. Medium format alternatives are 50 times that price – so we’re still getting kind of a good deal here.
I’ve had this camera for over three months now and I finally found the time to write up all my findings about this new gadget.
Let’s have a closer look at it in this article.
What’s this camera doing again?
The Spinner 360 is a 35mm camera created by The Lomographic Society. It takes a full 360 degree panoramic photo on one single negative. It spins around its own axis and exposes a 20cm long strip of film, including its perforation. That’s the equivalent of nearly 5 ordinairy pictures next to each other.
On a 36 exposure film you can take roughly 8 pictures (give or take).
Please note that you won’t be able to get prints from this camera at your local mini lab! You can ask them to develop the film for you, but make sure they don’t cut it. You’ll have to scan it yourself. Mini labs can only print 24x36mm negatives and yours will be 24x150mm. If you’re scanning your pictures at 1200 dpi, you’ll roughly end up with an image size of 1500 x 10.000 pixels – so be careful of what size your application can handle.
What’s in the box?
- 1x Lomography Spinner 360 Camera
- 1x metal Lens Hood (pre-attached to the camera)
- 1x Lens Cap (only fits if you de-tach the lends hood first)
- 2x “rubber bands” (they’re 5mm thick so the term is a bit misleading)
- 1x Camera Manual
- 11x “Contact Prints” of example shots, with explanations on how to create them on the back
- 1x pack of Silica Gel (always comes in handy)
- 1x giant poster (ca. 26x100cm, rolled up)
Packaging
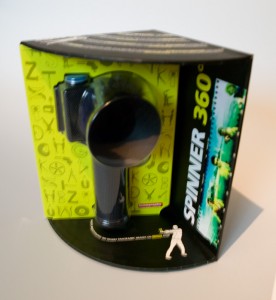
 As with many original Lomography products, the mere packaging is amazing! Imagine a cylinder with a diameter of 36cm, 26cm high. Then imagine a quarter wedge cut out of it – that’s your box. It’s a piece of art all by itself.
I always think of packaging and box art as something very creative, and I love it when it pushes my buttons. This one does – even if you never shoot with the Spinner, the packaging is good enough to get one.
Or maybe I just need to get out more.
The Outside and How to use it
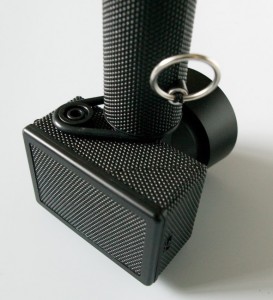
On the whole, you could describe The Spinner as a sturdy, well build camera. It’s covered with rubber on the outside with lots of little nobbles on it – so it won’t slip out of your hand.The whole contraption is rather heavy (400g without the film).
If you’ve seen the Lomography Fisheye before, the camera body looks a little bit like it, extented by a big stick on the bottom. This big stick sits at the front-centre of the camera body and turns counter-clockwise to move the film forward.
 The stick has a thick rubber band at the top which winds on the film. Instead of a “shutter button”, you’ve got a metal ring hanging out of that big grip. Inside the stick is a piece of string with a metal ringattached to it. To take a picture, you hold the stick, pull you the ring and then let go of it. It’s fun, try it a few times without a film in it.
On top of the camera we have a “cold shoe” for strobe flashes or constant light sources, a film rewind crank and a sprit level (featuring blue liquid, a water bubble and a dolphin).
Please note that the “cold shoe” is more like a holder, it’s not a wired hot shoe like you know from other cameras. Your flash won’t fire when you take a picture, unless you set it to manual strobe mode.
Greeting from Sydney!
Your post really helped me so much to learn about Spinner 360.
I am just a click away to purchase the camera, HOWEVER, thing holding me back is the film. Do I need to buy Lomography Color Negative films or any 35mm film with 400+ iso is fine? And when the camera lab develops the film, doesn’t it turn out to be negative colours rather than positive? How can you get the colours on the film?
Sorry, I am beginner with film camera and films.
Hello Kate,
glad you liked the post 😉
You don\’t need to buy Lomography film – any 35mm film will suffice: Kodak, Fuji, Ilford, you name it. 400 ISO and above is probably the best choice. Those films are also called 135 films and come in 24 and 36 sizes (which is the lenth of the film). For the Spinner, this means that on a 36 exposure film you can take 8 pictures.
The lab will be able to develop the film but won\’t be able to print it. You\’ll have to scan the film yourself to see the results. In the scanning process, you tell your scanner if you\’re using negative or positive (slide) film and then the scanner will convert the colours for you. Hope this makes sense.
Let me know if you have any more questions 🙂
Thank you so much!
That makes sense now. I always thought, how can people have positive colours on their film strips. Scanning is the key! Thank you.
Do you recommend any scanner for good scanning?
Thank you so much again for the reply and post!
Both Epson and Canon make great scanners. There is an overwhelming choice out there of course, and it all comes down to budget again.
I recommend an A4 flatbed scanner – they’re very versatile and you can usually scan 35mm negatives and positives (slides) as well as photos and paperwork. The more expensive models usually have better scanning software and accessories. I’m personally using an Epson Perfection V750, it’s a bit top end and probably overkill for the Plastic Photography I’m doing – the scanner’s resultion is probably much higher than the resolution of my camera’s lenses 😉 It was expensive but it is excellent.
Good luck and Happy Spinning 😉
Hi Jay,
Its been a while since youve posted this article, so im hoping you will still see this comment.
Id like to ask you what you use in order to get such great exposer with your interior shots.
I purchased this camera with high hopes of using it inside, as a reference for my drawings/paintings.
I know there is a space to put a flash on, but im not sure what type of light flash to get.
Do you have any suggests? If so, I would grealty appreciate. You can email me please :).
ps- your images came out great!
all the best,
Tarah
Hi Tarah,
yes it’s been a while indeed – and I’ve learnt so much about the wonderful Spinner that I feel it’s time for an update.
First of all, the results from this camera can be breathtaking! I really didn’t think I’d ever say that after looking at my first roll – so do stick with it if you’re disappointed with the first batch of pictures. There are so many ways of taking pictures with the Spinner – pulling the cord and letting go is just one of them. As with all these plastic cameras, outdoor shots always come out better than indoor shots – but having said that, I’ve just printed out a 19×90″ panorama from a dimly lit indoor shot and it came out rather well.
The trick with indoor shots is to let go of the cord slooowly. This can be hit and miss because it’s difficult to let go of the cord evenly. It will work well for quirky shots especially on black and white. A very high ISO film also helps – again this is easier to accomplish in black and white than in colour. Another way to take good indoor shots is to not use the cord at all: point the camera, hold it by the grip in your left hand, then manually swing the camera from x to y – as slowly as you see fit for the lighting. Could be half a second outdoors, or two seconds indoors. You won’t end up with 360 panoramas but instead with ultra cool shots, weirdly framed and sometimes squashed or stretched (depending if you twist the stick as well as the camera).
There’s a lot to be explored with this little gem that makes you think about taking pictures in a whole new light. The one thing to remember though is: precision is not the Spinner’s forte. If you need an accurate representation of a mural you’re painted across several walls, I would suggest to use a digital camera on a tripod in the middle of the room, take 6-8 shots (or more for a full 360) in evenly spaced intervals and then stitch them together digitally.
Hope this helps 😉
Thank you for responding! I was considering buying film with an ISO of 800, rather then 400, for indoor shots. Letting the cord wind slowly makes sense. This will be something I shall try. Im not sure how I would use the camera with out pulling the cord, but ill try to figure it out.
I feel that within my studio, during top daylight hours, would be a good time to take an indoor shot.
I suppose there are no specific light flashes for this camera?
I appreciate your quick response!
Thanks!
Tarah
Oh yes I didn’t explain the thing about the flash…
The Spinner has what’s known as a Cold Shoe so it won’t fire off any equipment that’s attached to it. But if you can find a flashgun with strobe mode you may get some cool results. The professional flashguns do that (i.e. Canon 580 EX and the Nikon equivalent) – you can set them to flash x amount of times per second, so while that’s strobing away you can pull the cord and have a (possibly) well lit shot.
I think if your studio has plenty of windows, then 800 ISO film is the ticket. Good luck with Project Spinner 🙂
So you are saying that the lab can’t print the pictures at all? OR they can develop your film but it just won’t come out with the perforations? Please explain the whole developing process cause I’m quite lost lol
Hi Nancy,
mini labs can develop your film but they won’t be able to print it for you. They basically have two machines: one that develops the film, and another one that expects 24x36mm negatives and prints them out. The Spinner doesn’t fall into that category. Your negatives are somehwhere around 35x280mm AND have perforations exposed – mini lab printers are just not made for that. If you have film developed by a mini lab, ask them not to cut it!
Lomography London can print contancts for you and possibly other Lomo Stores around the world can too. The best way to see your pictures is really to have a lab develop your film and then scan the film yourself. You’ll end up with rather large scans which you can bring back to them and ask if they can print them – or do it yourself if you have a photo printer.
It’s all rather cumbersome though – but seeing your Spinner shots printed out is VERY rewarding indeed! Good luck and Happy Spinning 😉
Hello
I just came across your website and review of the lomography 360 camera, can I just say that your review has pritty much sealed the deal for me.
I do have a question regarding the camera though, if the shutter is constantly open then once you have taken an image, is there a clouding at the frindges of the image due to over exposure, and if so is there a time limit on how long you can leave the lens cap off? I figured that having lived with it for a while you might be the one to ask :).
Thanks
Jon
Thanks for your comment Jon!
I can confirm there are no light streaks or clouding where the open slit exposes the film when you’re not taking a picture. There’s a 1-2mm thick black strip on the negative (as you’d expect) but that doesn’t intrude on neighbouring pictures.
Hope this helps – and happy spinning 😉
Fantastic, thanks for the info, that was the last thing bugging me. Ordered mine now, due very soon 🙂
Had the 360 for Christmas,now using it for the first time,and
I’m planning to scan the negatives on an Epson 3170 flat bed scanner.
Unfortunately the scanner software splits the film strip up into 6 x individual frames,
thus making it useless for this purpose.
I have not yet found a preference setting on the scanner which gets around this issue.
Before investing in a Digitaliza,which may suffer from the same drawback,do you have any other suggestions as to how I can get round the problem.
Hi Malcolm,
I feel your pain – if you’re using Epson Scan there’s an option somewhere called “automatically create thumbnails”- that’s what splits your negs. If you untick that, you’ll be able to mark the area you’ld like scanned. I can’t remember where that option is, all I remember is that it wasn’t in an obvious place…
If you’d like to scan perforations without the DigitaLiza the only viable way of doing it is by sticking your negs onto the glass.
Jay…
You’re right. The option to untick the thumbnail option is hidden away in the preview box. Glaringly obvious it is not !
I’ll now think about buying the DigitaLiza.
Many thanks,
Malcolm Denton.
Jay,
I’m thinking about buying the camera along with the DigitaLiza for scanning but one question I have is after scanning the film.
After scanning the film.. does the image come out colored or in black and white? Is there anything special to do to make it be colored? (Beginner here!)
Thanks!
Hi Molly,
the colour/black and white scenario is determined by the film you use. There’s colour flim and black and white film – and furthermore there’s colour negative and colour slide film (the first comes out negative, the other one is a positive). You can of course shoot on colour film and then scan the film in black and white (although I’d reccomment scanning it in colour and converting your pictures to black and white afterwards – so then you’ve got the option to use them in colour if you like).
Let me know what you’d like to achieve and I can reccommend a workflow.
Jay,
Love your website and your review of the 360 Dolphin Spinner. I am trying to determine what scanner I should buy so that I can scan my developed film. I believe in an earlier post you mentioned you were using the Epson Perfection V750. I checked this out and it seems way out of my price range. Do you know if there are any scanners that will do the job for under $200 and if so do you have any recommendations?
Thanks for your time and help, I appreciate it.
Brian
Hi Brian,
sorry for the late reply. The one thing to look out for in a scanner for use with Spinner negatives is that it should be an A4 flatbed that can scan negatives. There are very cheap and small 35mm scanners around but they can only scan one 35mm pic at a time – not good. You also need to stay away from all-in-one machines – they won’t scan negatives.
They have two lights (one at the top and one at the bottom) to shine through the negs. Canon make some nice ones for around £150, so do Epson. The Epson V330 sounds nice for only £75 – should do the trick 😉
Jay,
Thanks for the advice! I think that I will get the scanner. Do you know if it scans more than one 35mm pic at a time?
Thanks for your time and help, I appreciate it.
Brian