 I was just browsing through my archive and stumbled upon an iOS App I’ve made a few months ago. It looks great on the new iPad due to really hi-res images – but what’s even better is that it’s written almost entirely without code!
It’s still using Xcode so it’s a native app of course, but there are no complicated Objective-C statements in there (apart from one but it’s not essential to the app).
Here’s how I did it – I even give you the source code too.
Xcode 4.2 and later have this wonderful feature that makes switching from one scene to another much easier. All you do is drag-and-drop from one view to another. All views are part of a single file now which is called a Storyboard. This is fantastic news if you’re not a coder and instead a creative guy who wants to get things done rather than learn abstract code for the rest of your life.
The bad news is that without some guidance it’s not something you’ll figure by yourself after dinner. There are several books on how to get started (many of them outdated or too confusing) which is why I highly recommend reading Sam’s Teach Yourself iOS 5 by John Ray. I’m reading it for the third time now (well the third edition actually… all the other ones were outdated you see). This will get you through Xcode 4.2 and beyond.
Inspired by how easy it is to create views and string them together with amazing transitions I’ve made this app – and here’s what it looks like in action:
This is an iPad app that features five buttons from the Segmented Control thingy. Each segment triggers an action to display a new view with a new image via a very fancy transition. It’s written entirely without Objective-C code. It’s all done via segues in Xcode using drag and drop.
The Popover at the top can be triggered twice – once without code (on the left) and the other via code, but that’s optional. It’s just showing that it results in the same thing.
Another optional thing is one UIAlertView (i.e. the info button at the top right) which activates a quick Info Window.
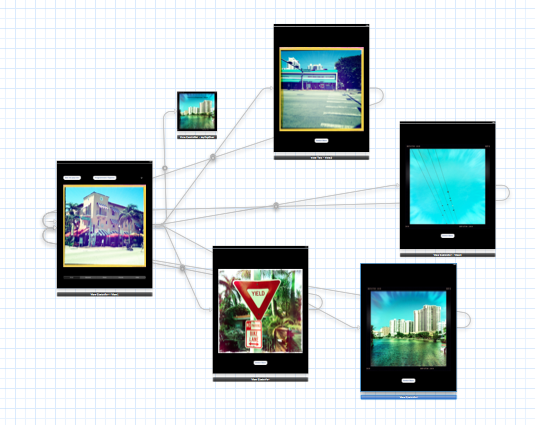
Here’s what Xcode’s new Storyboard looks like:

All you do is to crontrol-drag from one view to another, select what kind of transition you want and run your app. Each of the grey lines represents a transition, both from the Segmented Control and back from the button. It’s that easy!
Those pictures were taken on my iPhone with the wonderful Hipstamatic App. I left the resolution as large as possible so this looks rather ravishing on the new iPad I must admit.
If you have Xcode then you can try it out yourself – here’s the source code.
Enjoy 😉