Manga Studio has a great feature called Materials. These are akin to Photoshop’s Patterns, but I find they are implemented so much better in Manga Studio.
In the olden days, traditional Manga tone artists would cut out small pieces of a pattern out of a larger piece of paper, then stick it to the coat of a drawn figure. That way the coat looked like it had texture (without distortion mind you).
This is how Materials work in Manga Studio: create a selection (say around the coat in question), then simply drag in the material it should have. Once in place you can scale and rotate it. All this happens on dedicated Material Layers.
Let me show you define your own pattern images as Manag Studio Materials and where to find them on your hard disk.
Defining Materials
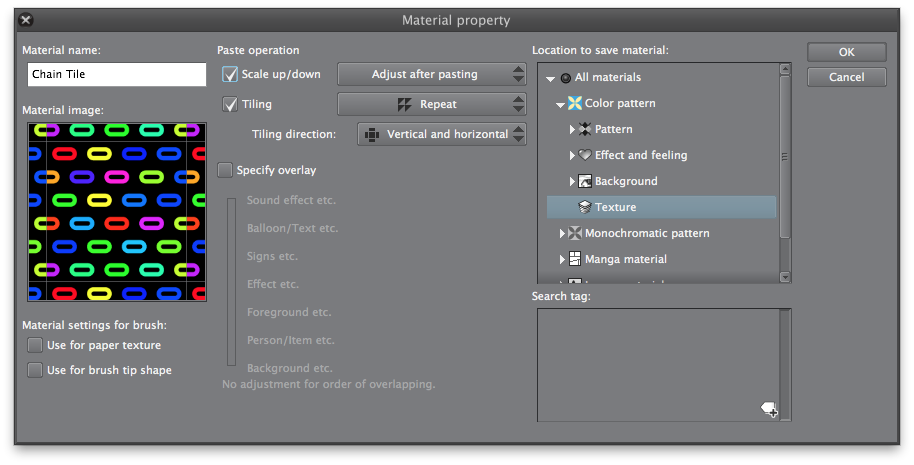
Open the image you’d like to materialise, then head over to Edit – Register Image as Material. This will bring up the following dialogue box:

Now you can give your Material a name, define if you’d like it to be scalable and if it should be tiled when repeated (and if so how). For seamless tiles, choose vertical and horizontal. For larger images which are not meant to be tiled simply unstick the tiling box.
Manga Studio will display your Material alongside its default arsenal which is huge – therefore it’s important to pick a category for your Material from the list on the left. Click the disclosure triangles to see sub categories. You can also give your Material tags to aid searching (click the little icon at the bottom right to add a tag). It’s great to know you’ll be able to find your treasures again in various ways.
When you’re done click OK and your Material is now available for use. Huzzah!
Exporting and Importing Materials
As much as I love Manga Studio and its versatile interface, there’s one thing that the team have missed: adding an option to export such things as Materials and Brushes.
Hence there is no way to import or export Material Data to and from Manga Studio.
And believe me I’ve tried: First I figured out where your data is stored on the hard disk. On both Mac OS X and Windows, Materials are saved in /Users/you/Documents/Smith Micro/Manga StudioCommon/Material.
This folder has sub-folders consisting of random two digit numbers. Each folder can hold similar sub-folders (again made up of two digits). One folder down from there we find the actual database entry for your Material, in a folder named with what appears to be a 32 digit hex code, decided into groups of 10-4-4-4-10. Don’t ask…
In this ultra cryptic folder is a thumbnail in PNG format by which you can determine what Material you are looking at. So far so good.
It stands to reason that you could simply move materials using this folder, but remember this is just data on a hard disk, NOT a database entry to which it correlates. To make matters worse, one computer may save a Material in 42/27/xxxx, while another one may save it as 92/14/xxx. You get the picture.
After moving a folder the Material is ignored on the destination device. Even with the options “Install Material”, “Organize Materials” and “Reset Installed Materials” the new data is not imported. If you find a way to do this please let me know (all this has been tried and tested in Manga Studio 5.0.5 non-EX in Windows 8.1 and OS X 10.9.5).
I can only recommend to save your tiled patterns and re-create them on your other machine.

Hey, I’m trying to register a material, but all I can’t seem to select any of the options in the ‘register materia’ window. please help!
That’s a shame. Have you got a screenshot?
When I drag a thought balloon onto my page, the outline is defined as vector art, which I can manipulate by control point or handle. But it also contains a white fill, which updates as the balloon outline changes. But objects created within the program on Vector Layers canNOT be filled! Is there any way I can create a balloon of my own with this fill property included? Thanks!
Hi Kevin, that’s right, Vector Layers cannot be filled directly. But you can fill a raster layer with colour underneath it. You do that by declaring your Vector Layer as a Reference Layer, then switch to the Raster (colour) Layer and use the fill tool on it. I’ve explained how to do that in detail here: http://www.versluis.com/2015/11/how-to-use-reference-layers-in-manga-studio/. Hope this helps!
Sadly I can’t help you on the ballon defining front – sorry.
I have an image of a bubble that I can add to materials, but it doesn’t recognize it as a bubble layer, so it won’t let me add a tail to it. Does anyone know how?
Hi Seth, that’s a tricky one: the balloons aren’t stored as image materials, they’re vector shapes. When you add a tail to a vector shape, points are inserted into the line and the contour is re-drawn on the fly. That’s how you can tweak the shape of the balloon or the position/bend of the tail afterwards. But adding a tail to an image material isn’t going to work, because pattern materials are stored as raster images.
However, depending on the complexity of your bubble, you could use the Balloon Pen Tool and re-draw your shape, then register the whole layer as a material. This will store it as a vector material, much like the other balloon types in the library. It’ll let you attach tails too, just like with normal balloons.
Hope this helps 😉