I have recently explained how we can create morphs for DAZ Studio assets with external applications, and how to apply them to characters and clothing using Morph Loader, or something like the GoZ Plugin. You can watch those videos here and here.
One of my viewers was asking – quite rightly – what to do with the applied morph, and how to save it. The answer to that question is a little in-depth, and depends on what you’d like to do with said morph. I thought I’d expand on the answer I gave Scott in one of the above videos with this article.
1.) Saving your whole scene
The first option to preserve a morph is to simply save your scene. This is done by heading over to File – Save As… This will create a .DUF file, referencing all objects and their configurations in your scene.
Note that you can only load this file on the same system that has saved it to make all the content appear in the correct places, unless the second system you’re loading this file on has the same referenced content installed. If that’s not the case, and the content is from DAZ3D, you’ll be prompted to install the content at this point. If DAZ Studio can’t find your content, it’ll display grey boxes instead of your objects (which can look a tad scary).
For your own work, saving your full scene is a good approach, but not so much if you intend to re-distribute the morph, or if you want use your morph in other scenes you’re creating. Lucky for us, we have two more options.
2.) Saving your morph as a Morph Asset
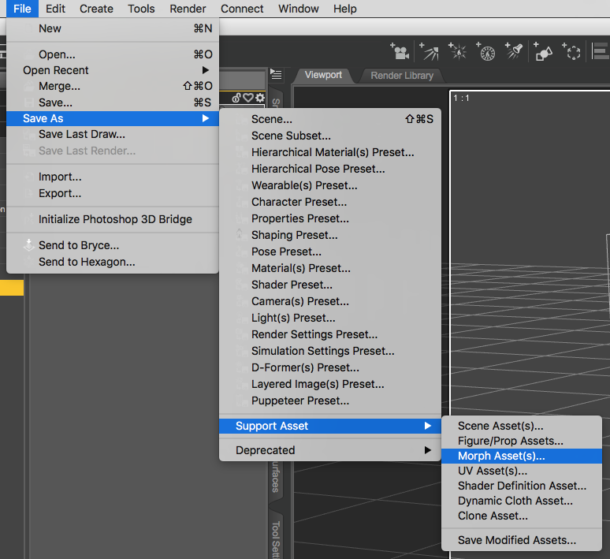
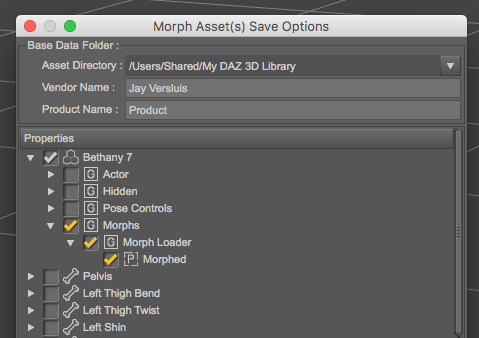
To save the morph independently from any objects that make up your scene, head over to File – Save As – Support Asset – Modifier Asset. This will bring up a dialogue box that lets you choose what you’d like to save and to which library. NB: in Daz Studio 4.23 and later “Morph Assets” have been renamed into “Modifier Assets” (please excuse the outdated screenshot), but the functionality is still the same.

Select your morph (and only your morph) to save it. Make sure it’s titled properly and added to the hierarchy position of your liking at this point, including any limits or other customisations. You can tweak those by putting your Properties Tab into Edit Mode and making the appropriate adjustments.
For example, rather than putting your morph into a root folder named “Morph” or “ZBrush”, create your own, or simply choose a better position. Sadly I neglected to do this for this screenshot, in which I’m sticking with a default Morph Loader import.

The advantage of saving as a Morph Asset is that you can now load another figure of the same generation and find your morph in the same position, ready to be dialled up for future use. You can even distribute your morph and share it with others, if you know where to find it. Let’s talk about that next.
Where does DAZ Studio save that Morph File
When you save a full scene, you’ll be prompted for a file location. That’s easy. However, saving a Morph Asset doesn’t bring up this dialogue, which makes it a tad harder to find. In the above mentioned dialogue, you’ll be prompted which Asset Directory you’d like to use. In other words, which DAZ Library you want to use. If you’ve told DAZ Studio to handle multiple libraries, you can choose one from the drop-down menu.
Morph Assets are .DSF files, stored in a subdirectory of the selected library. On a Mac, the default Library is /Users/Shared/My DAZ 3D Library. On a Windows system it’s Users/Public/Public Documents/My DAZ 3D Library.
In here you’ll find a folder called /data/DAZ 3D, followed by one for each generation of the Genesis figure. In those folders you’ll see Male and Female subfolders, in which you’ll find Morphs, followed by the vendor and the product. It means we have to dig deep, but it’ll become clear as soon as you traverse that structure on your own system after saving a morph.
In the above example, I’ve got a Morph called “Morphed” for Bethany 7. She’s a Genesis 3 character, which means the library path to the file I’m looking for (as per the screenshot above) would be /data/DAZ 3D/Genesis 3/Female/Morphs/Jay Versluis/Product/Morphed.dsf.
I could give you this file and ask you to install it to the same location on your system, and as soon as you load a Genesis 3 Female figure, you’d see that same slider as I did, producing the same results as on my system. Vendors usually distribute not just the single morph file, but create an empty “dummy directory structure” like the above, so that receiving users can simply unZIP the file into their Library. This will copy your morph file into the correct location.
I hope this helps clear up some of the Morph saving mysteries in DAZ Studio. Happy Morphing 🙂
Nope, this is not working at all. Morphs won’t show up!
Hi Jay. Your videos and articles are so helpful. They are the most reliable and complete sources for any given topic which means I don’t have to search around elsewhere for missing pieces. Thanks! – Arjun
That’s so nice to hear, Arjun! Thank you for sharing this with me 🙂
I used .DSF to search for files in the file explorer for windows and it found them.
Save As>Support Assests>Morph Assests are not enabled to select. Do you know why this is? I have my figure selected so no idea why it would be disabled. Any guidance would be greatly appreciated. Thank you.
Hi Chrissy! They’ve renamed Morph Assets into Modifier Assets in a recent version of Daz Studio. Nobody really knows why 🧐 Let me know if that works for you. I’ll go ahead and amend the article for future visitors.
Ah, I see now. Yes, this article was done sometime ago and I just was hoping you would still reply. Thank you!! That works for me. Thank you so much for your help Jay!
Cheers🥂
Chrissy
You’re very welcome! If you need anything else, just let me know.