There is a neat way to turn static meshes into dynamic follower clothing in Unreal Engine! Since 5.3 there’s a Chaos Cloth plugin that ships with the engine, although it’s only really become usable in 5.4. It looks more complicated than it is, so let me walk you through the basic workflow in principle:
- create a new Cloth Asset (in your content browser, under Physics)
- add a static OBJ/FBX or USD mesh file (the clothing)
- add your skeletal mesh (the character wearing it)
- transfer skin weights (akin to Transfer Utility in Daz Studio)
- paint a weight map for clothing simulation (optional for wafty parts)
- add your Physics Asset
- simulate or render
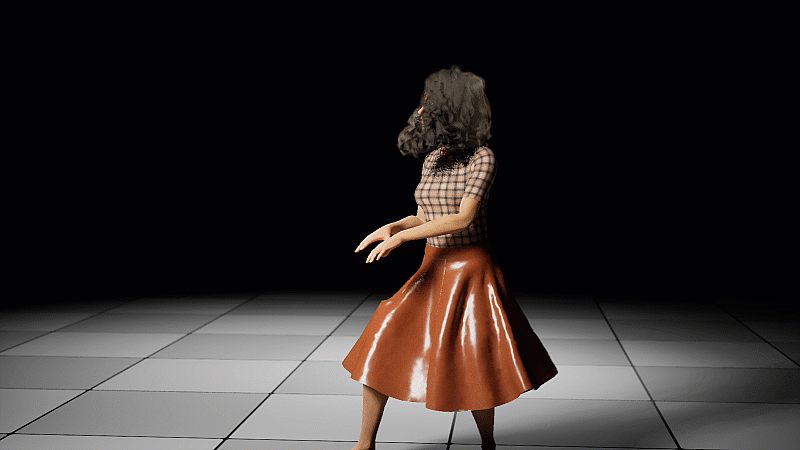
Let’s take a look at this process step by step. For this example I’m using a Genesis 9 character from Daz Studio and a garment I’ve made in Marvelous Designer, but as long as the outfit fits your avatar, this works with any static mesh clothing in OBJ format.
Prep Work
In Unreal Engine, head over to Edit – Plugins and find the Chaos Cloth and Chaos Cloth Asset plugins. These are present in versions earlier than 5.4, but are a little harder to use. Once enabled, restart UE.
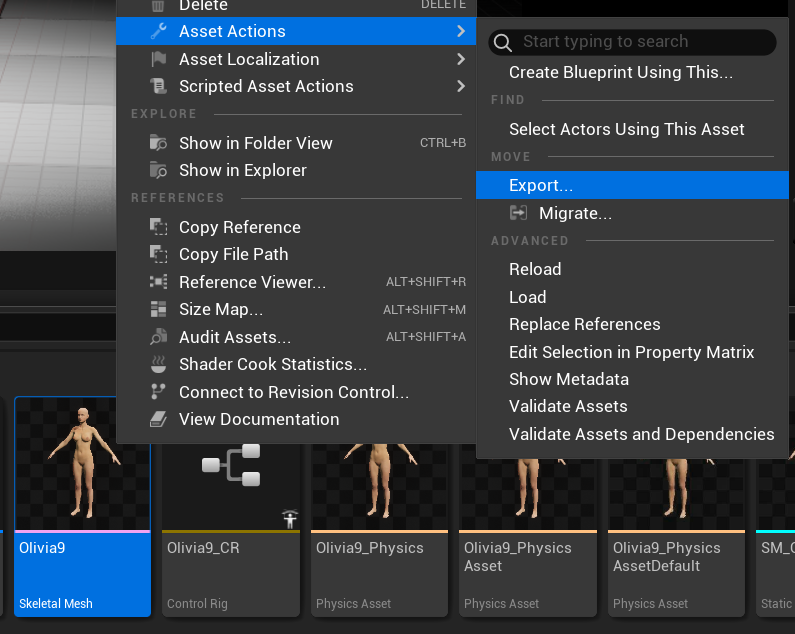
I’m using the Daz to Unreal Bridge from David’s Github repo to export my nude custom character over to my UE project. From there I’ll use Asset Actions to export the avatar as FBX with default values so I can make an outfit for it. The exact process you use here this doesn’t matter, as long the outfit fits your character in the A-Pose.
Next I’ll use Marvelous Designer 12.2 (the latest perpetual version I have) to bring in the avatar. The FBX import settings for UE exports are these:
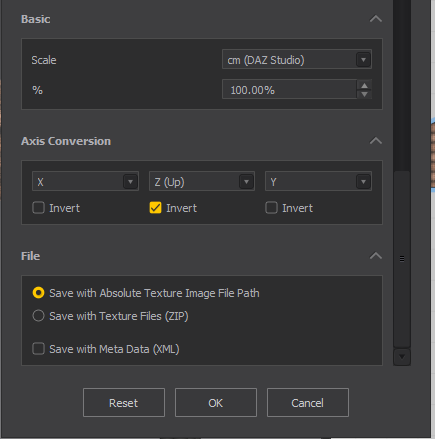
- Scale: cm (Daz Studio)
- Axis Conversion: Z Up (inverted)

After UV mapping and fitting, I’ll export my outfit as OBJ with the following settings:
- all pattern pieces and trims (if you have any)
- no avatars
- Single Object, welded, thin
- Unified UV Coordinates
- Scale: cm (Daz Studio)
- Axis Conversion: Z Up (inverted)
I’ll import this OBJ into Unreal Engine and it should fit our avatar.
Physics Asset
Our figure will need a modified physics asset so that the cloth can properly collide with its shape. UE can’t use the mesh itself because the calculations would be prohibitively expensive. By default it will generate capsule collisions like these ones, but they’re so terrible we can’t really work with them (nor would we want to).
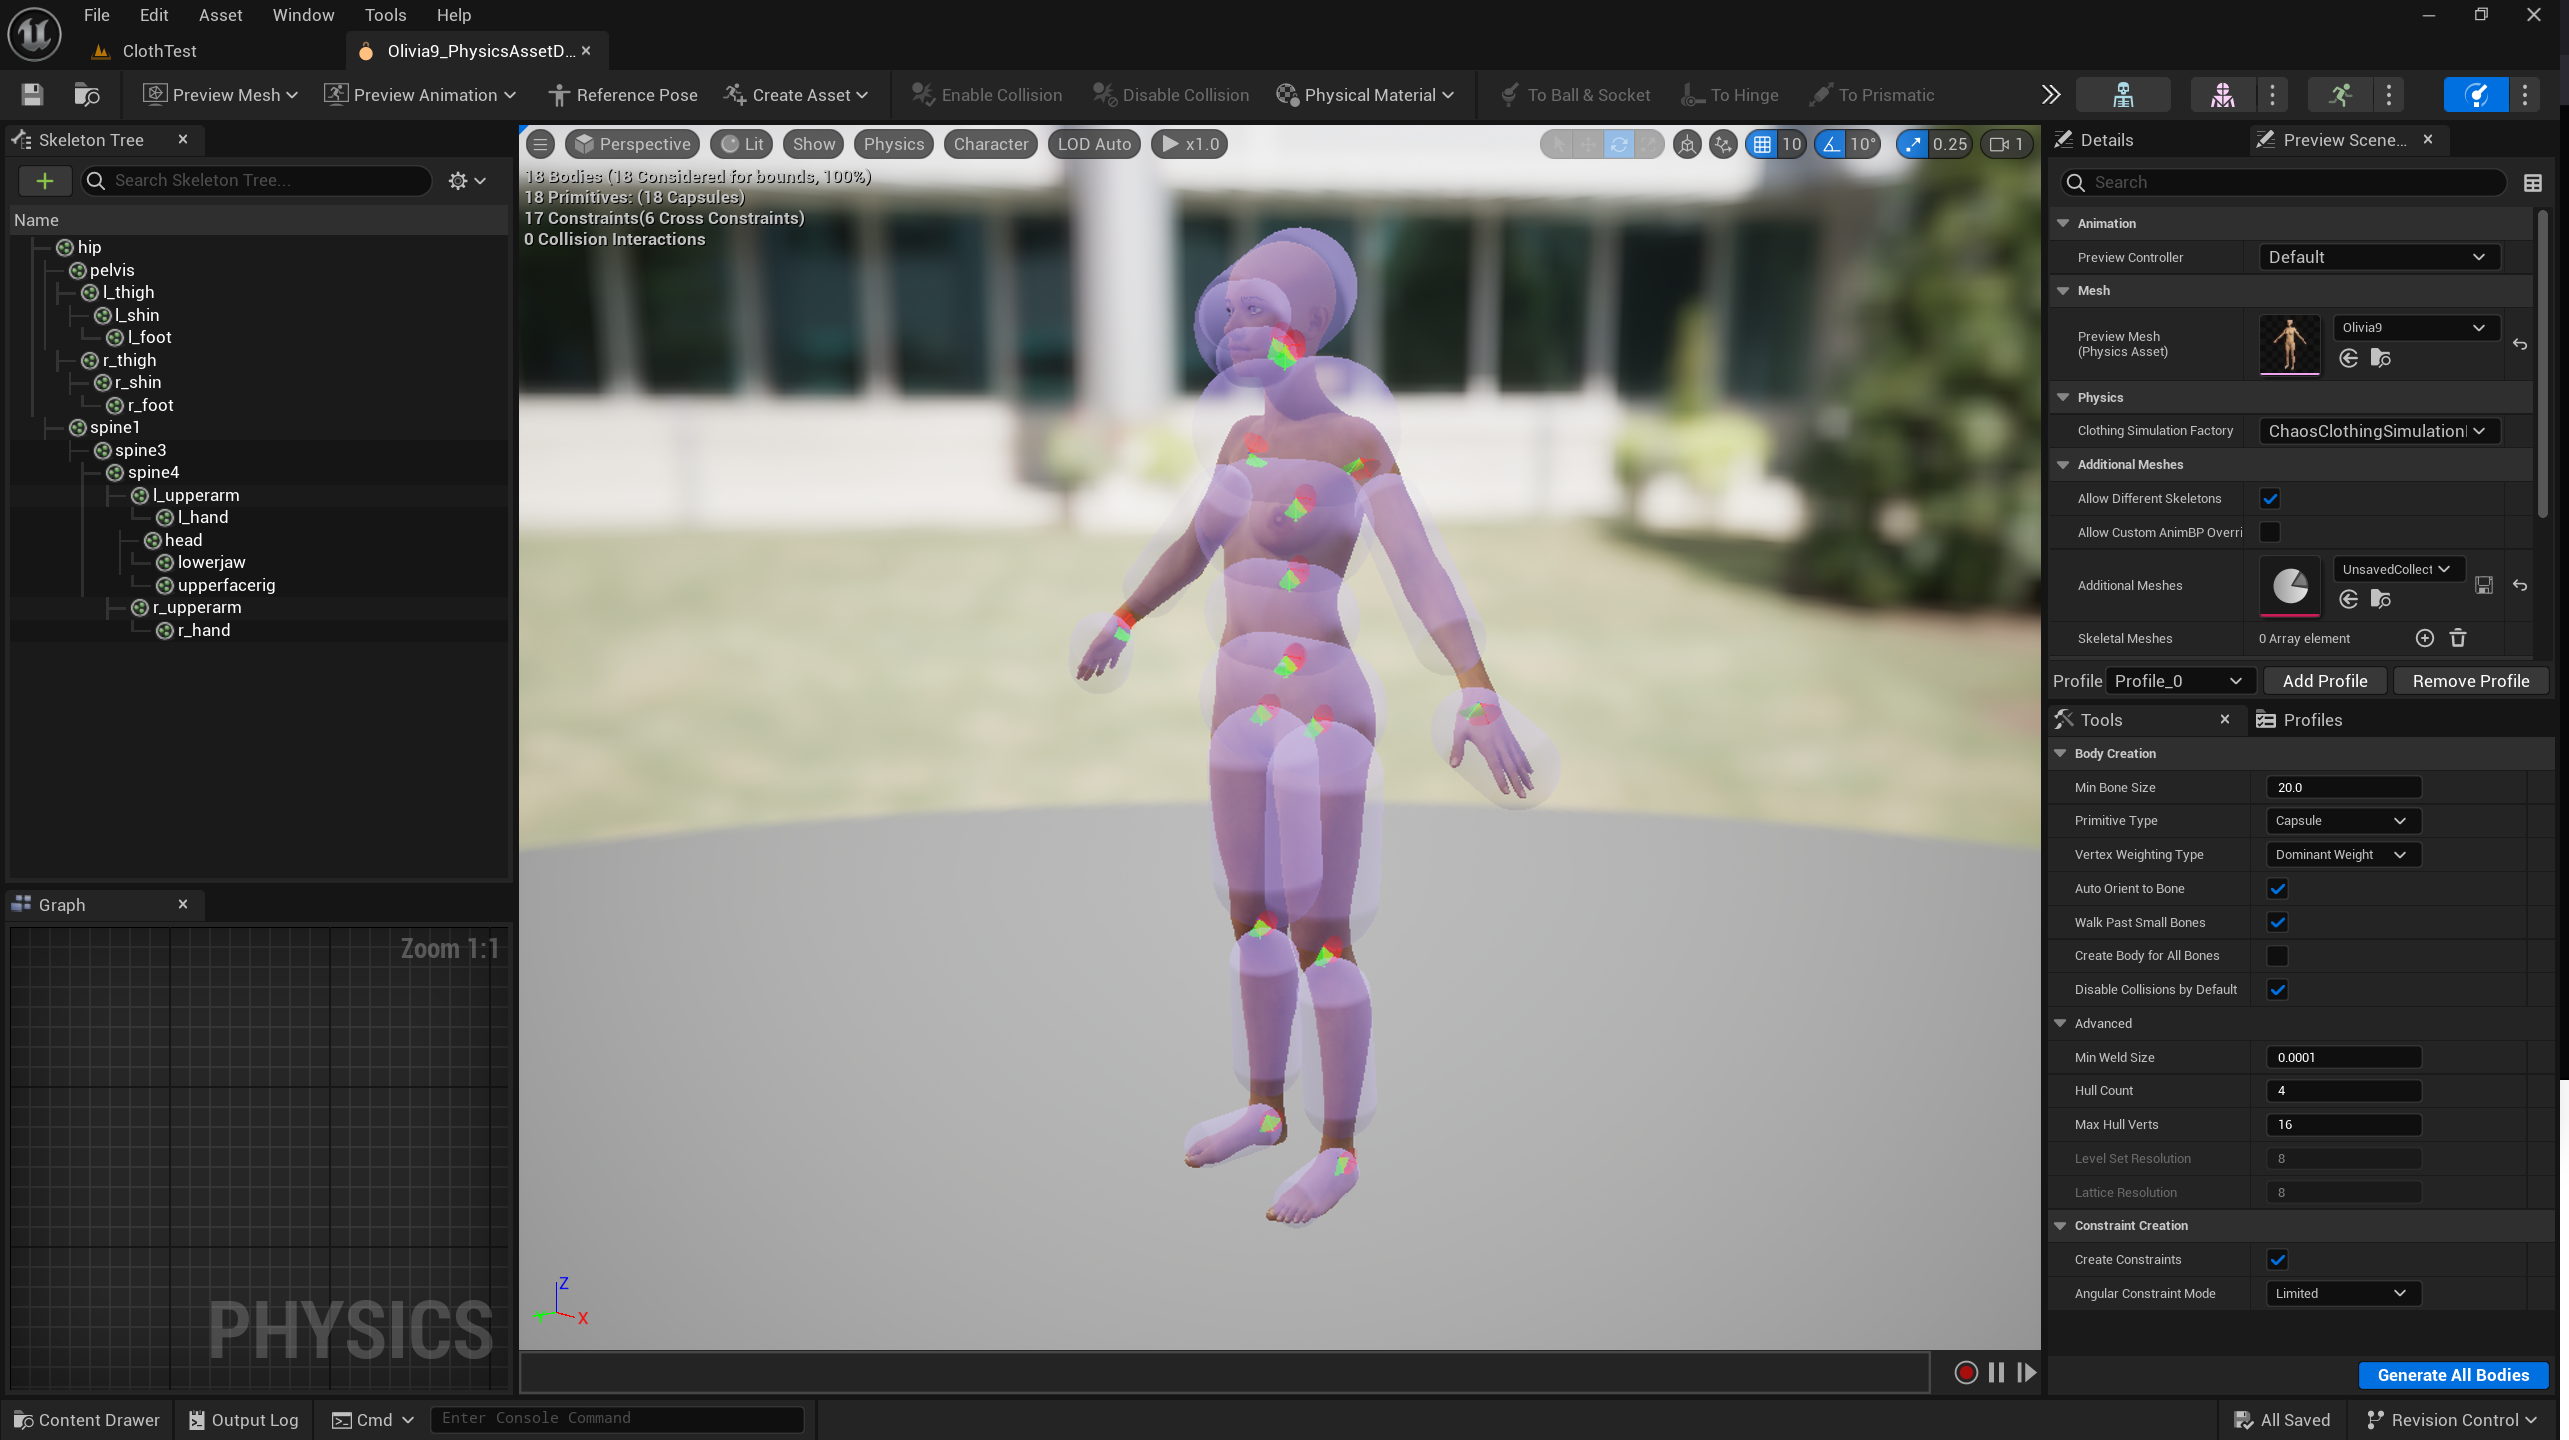
Let’s create a new one by right-clicking on your character and choose Create – Physics Asset. Use these settings to get something more appropriate for our situation:
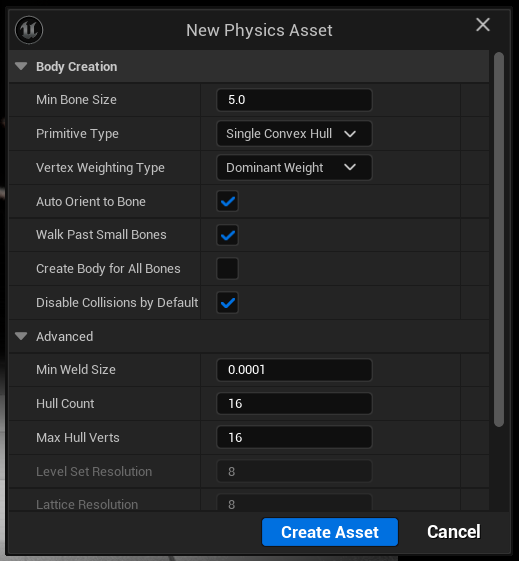
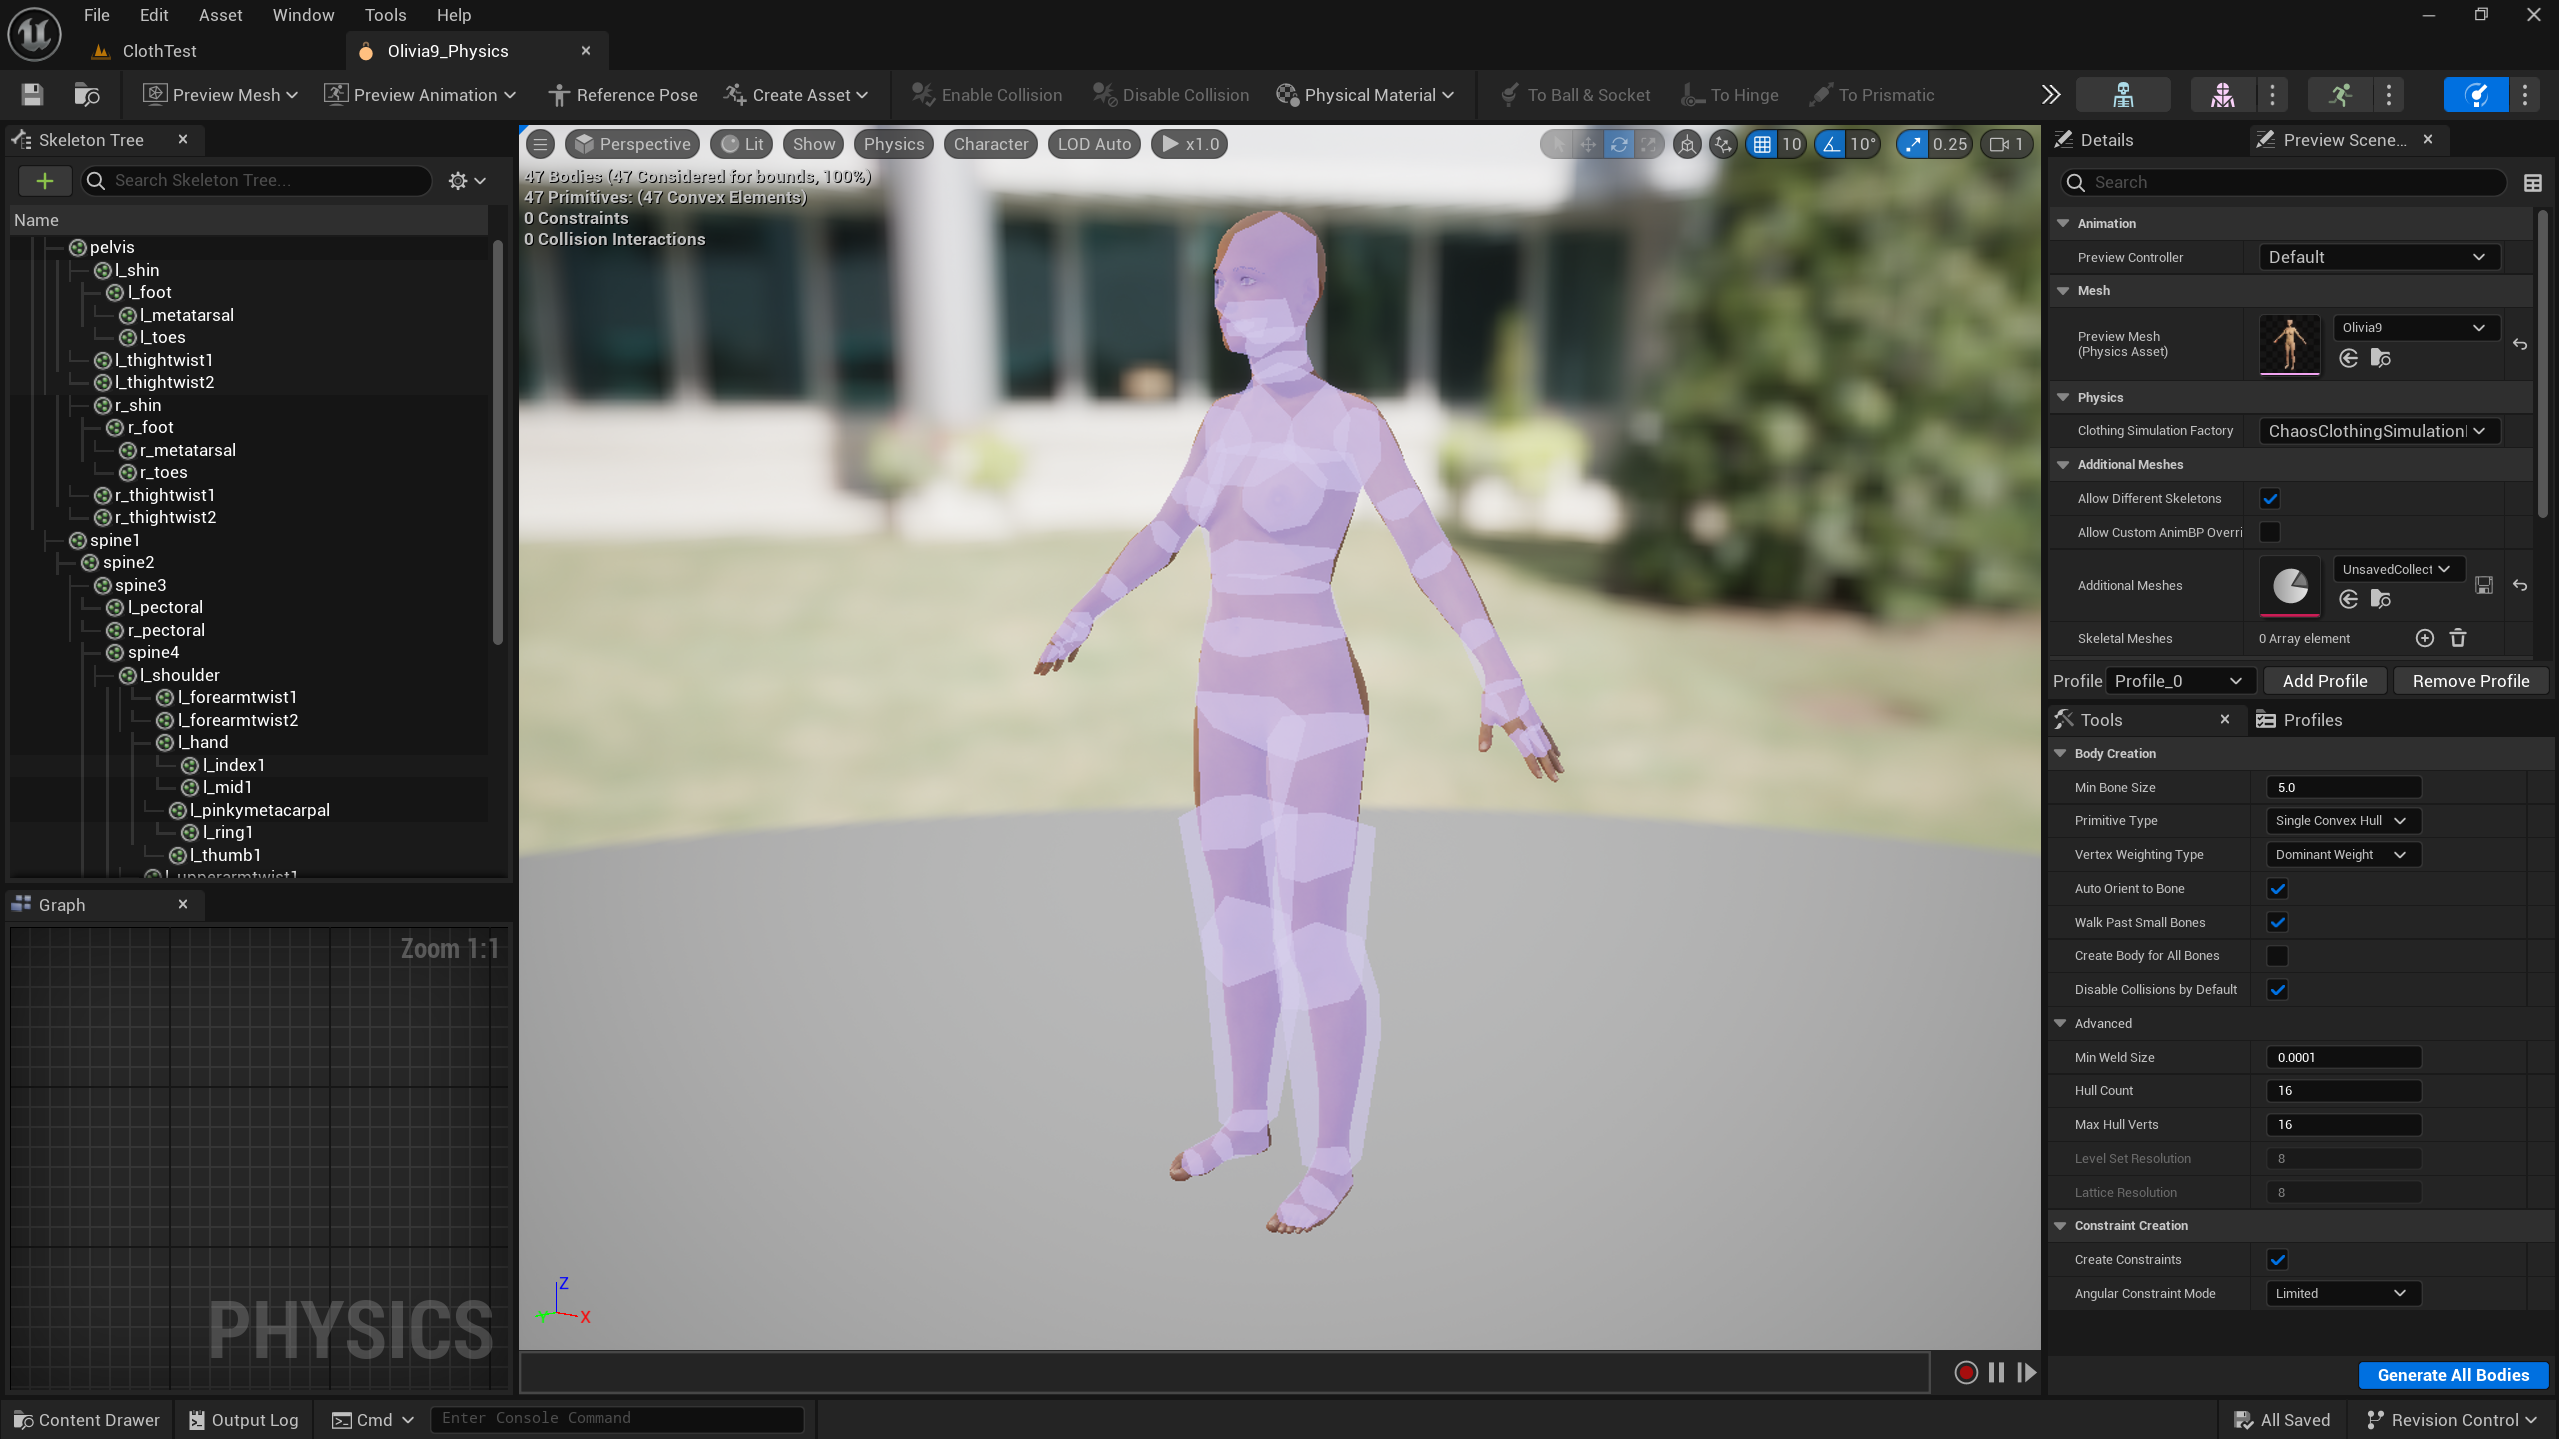
I’ve made the lower legs a little wider to avoid poke through on my skirt later. Here’s what it looks like now:
Creating the Chaos Cloth Asset
Find a good spot in your Content Browser and create a Cloth Asset. I’ll call mine CA_Outfit. Open it up and you’ll notice that UE 5.4 creates a Dataflow asset as well, which is a scary looking node graph. In earlier versions you had to create and populate this yourself. It is actually the dataflow asset that’s now open.
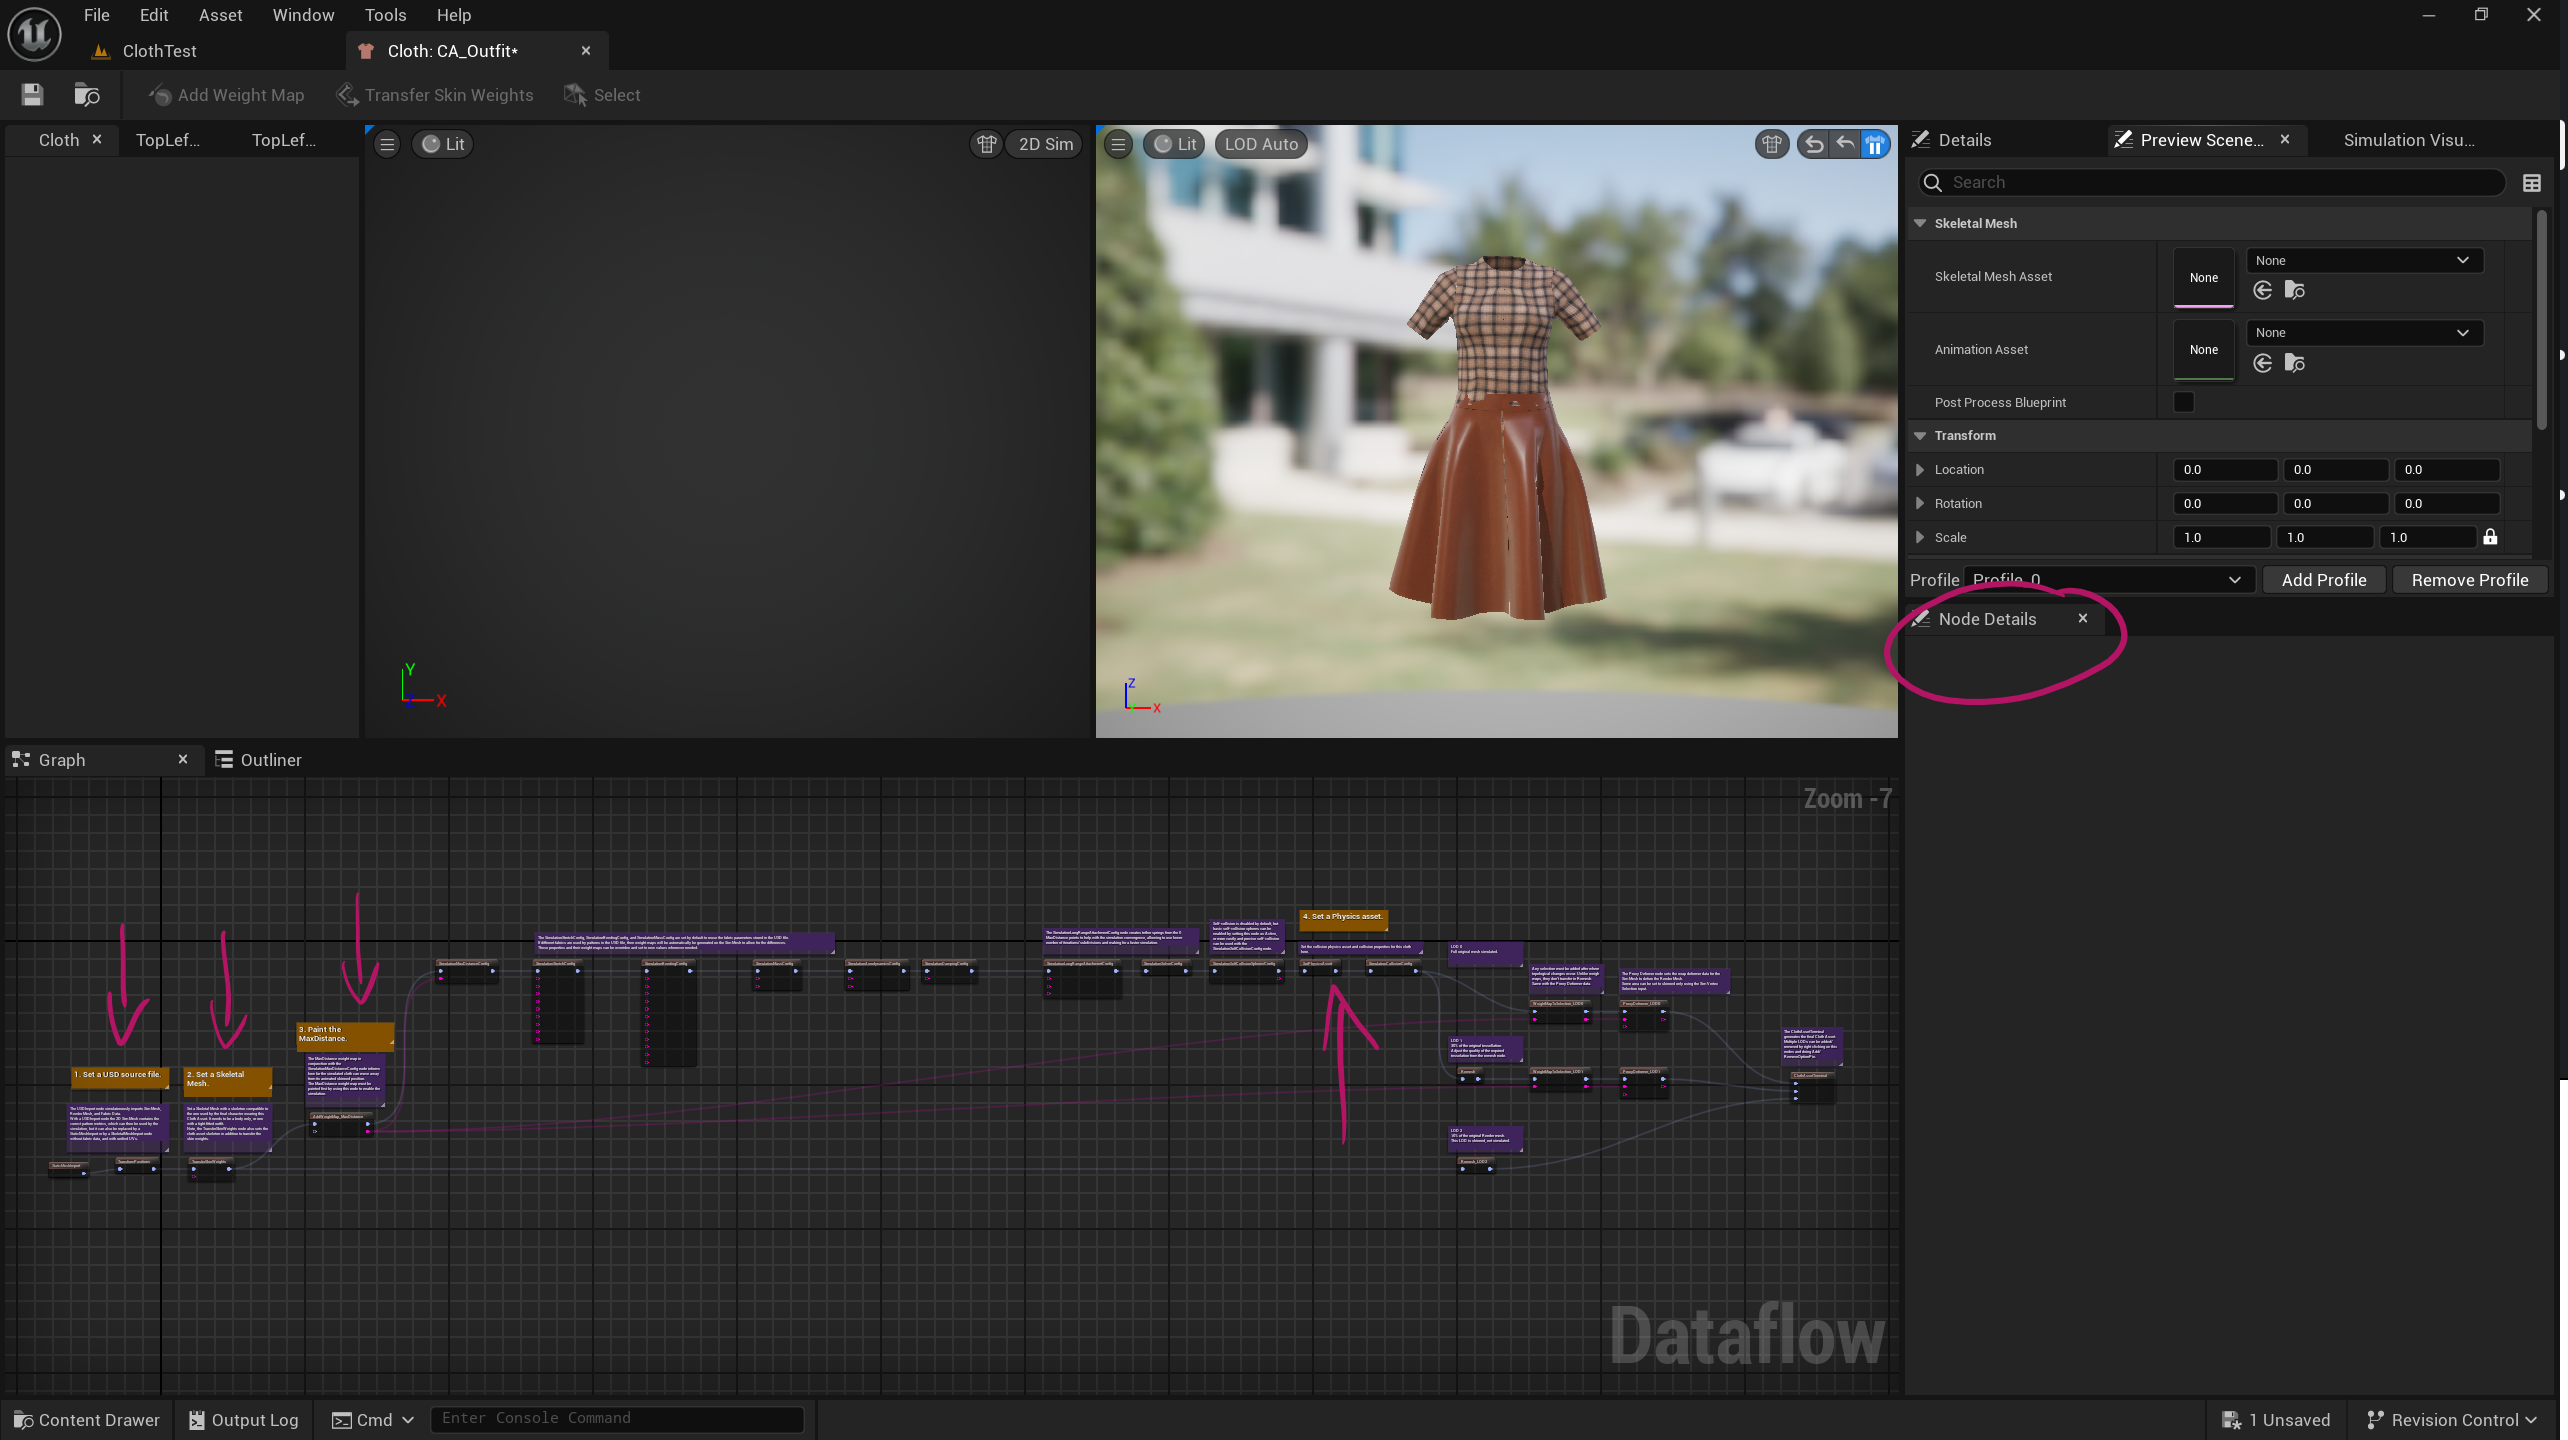
Don’t be alarmed by all those nodes! The ones marked with the orange comment (and my pink arrows) are the only ones we need to populate. On the right hand side, you’ll see a Node Details section. When you click on a node, our work happens in that Details section. The four points of interest are:
- loading our static clothing file
- setting our character mesh
- transferring/painting weights (what wafts, what doesn’t)
- set our physics asset
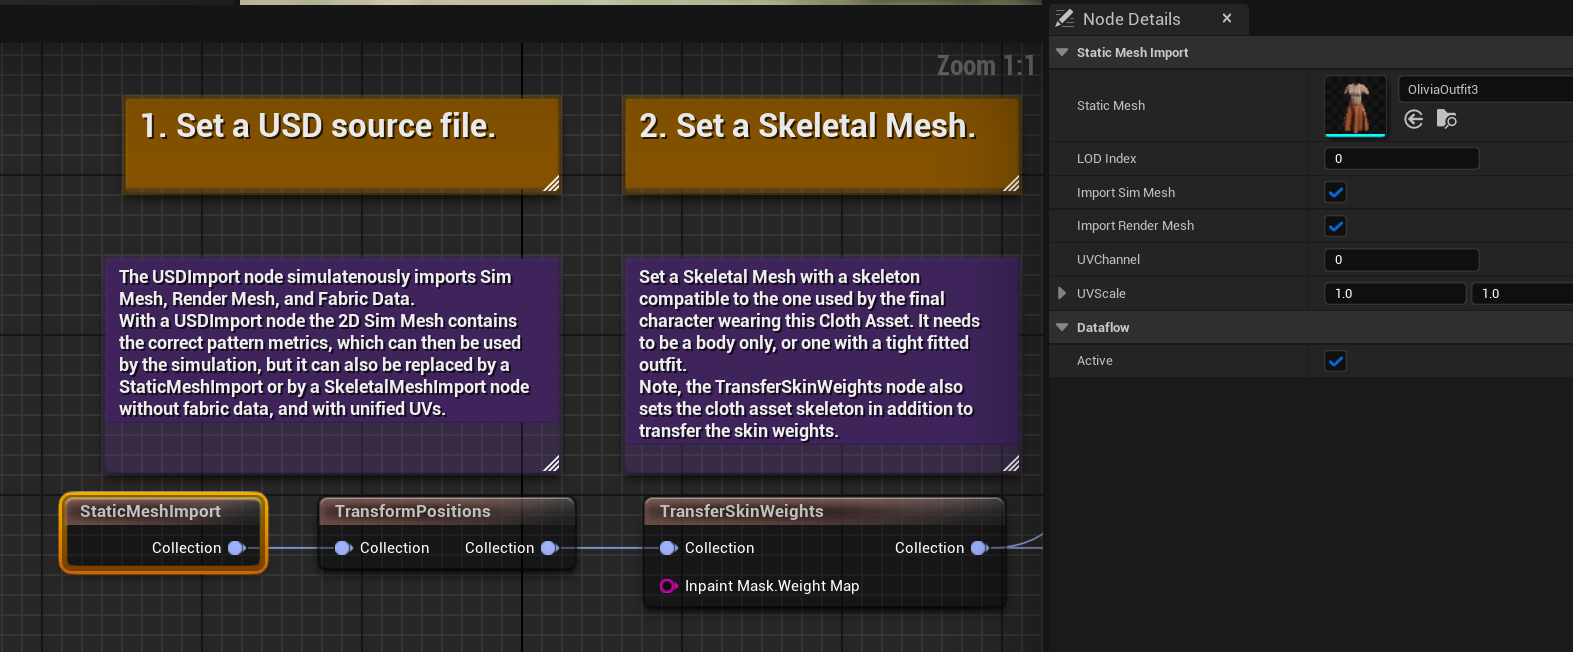
Starting on the left, we can load our static clothing mesh. By default this first node will read USDImport, but in my experiments this only worked with assets exported from Marvelous Designer 2024 and later (and undoubtedly going to change very soon). My older version of MD can’t export USDs the way UE needs them, and I found it much easier and more flexible to work with OBJ files. So remove that node and connect a StaticMeshImport node instead, then pick the OBJ clothing we’ve imported earlier.
We can ignore the next node called TransformPositions, just know that this is where you can make positional changes should your garment not align perfectly with your skeletal mesh.
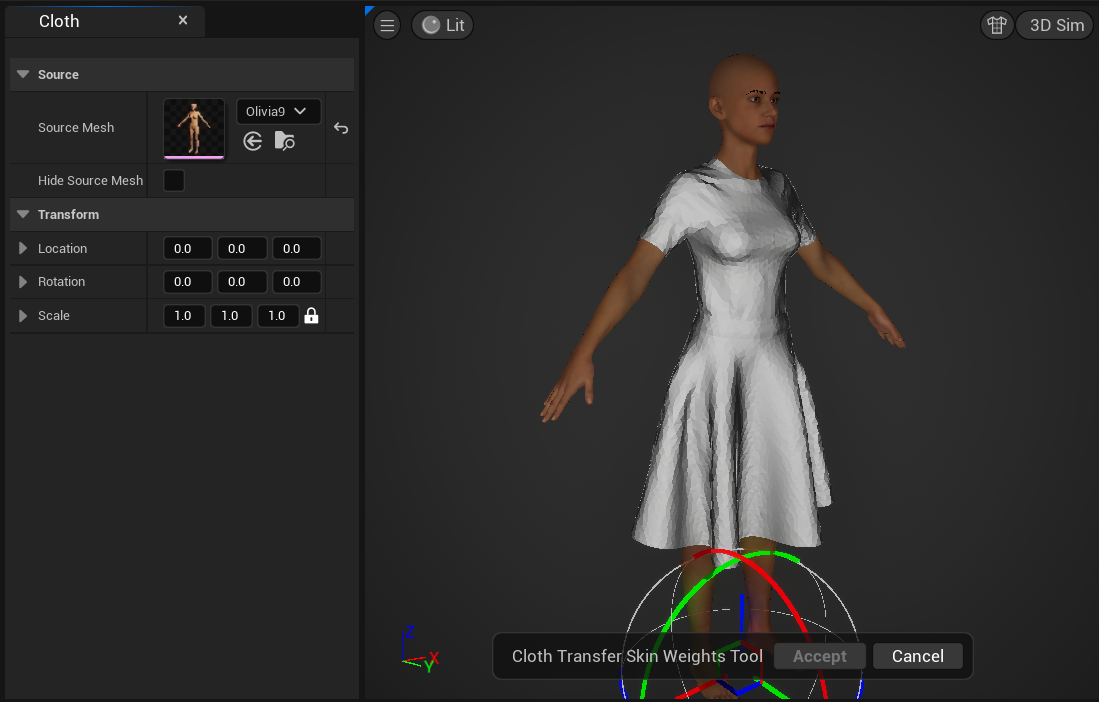
After setting your Skeletal Mesh in the third node (section 2), we’ll have the option to transfer all skin weights from the character to our clothing. This is fast and efficient and essentially creates conforming follower clothing for us. If we didn’t do anything else, our clothing asset would already be usable – and perhaps more interestingly – changeable without having to swap out the whole mesh at runtime.
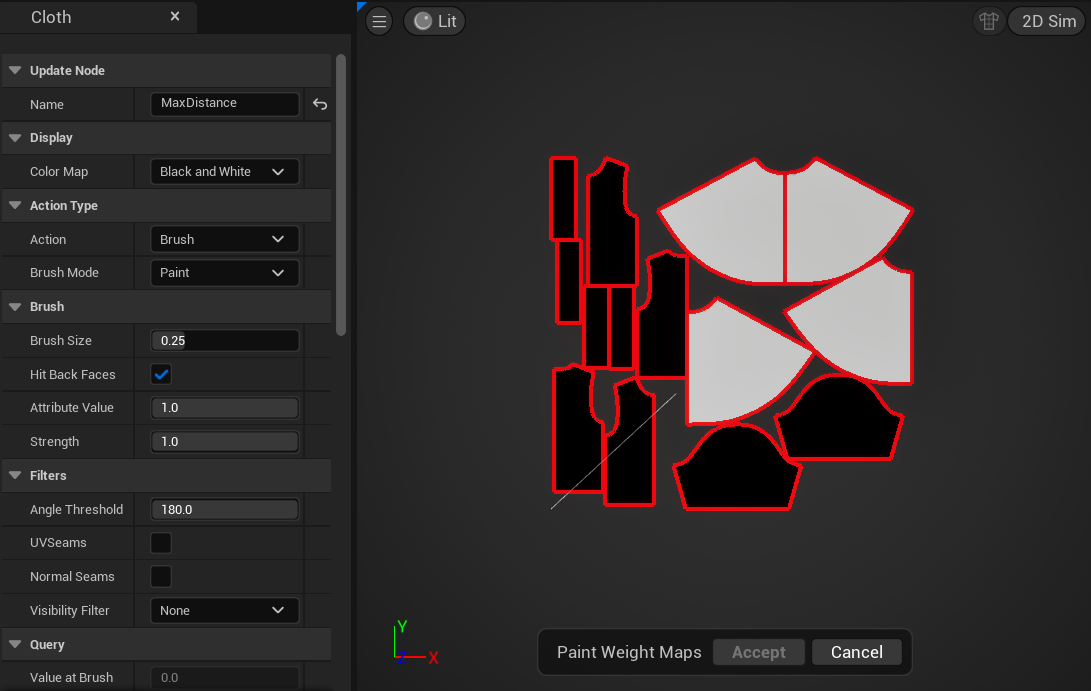
The next node (section 3, paint max distance) lets us take this one step further by painting in the parts of the mesh that should behave like cloth. Everything that’s black will move with the character mesh, everything painted white will become cloth.
Note the interesting tools we have under Action Type (brush, fill, gradient, smooth) and the top right drop-down in the viewport that lets us change between the 2D and the 3D view of our garment. Makes painting weights so much easier.
Let’s skip the next few nodes that deal with fabric properties until we reach the Physics Asset section node (section 4). Pick that new and improved physics asset we’ve created earlier.
UE 5.4 is really unstable when you swap out or make changes to the Physics Asset. If you need to make a change, make sure any live simulations are disabled in any of your viewports. Save before doing anything.
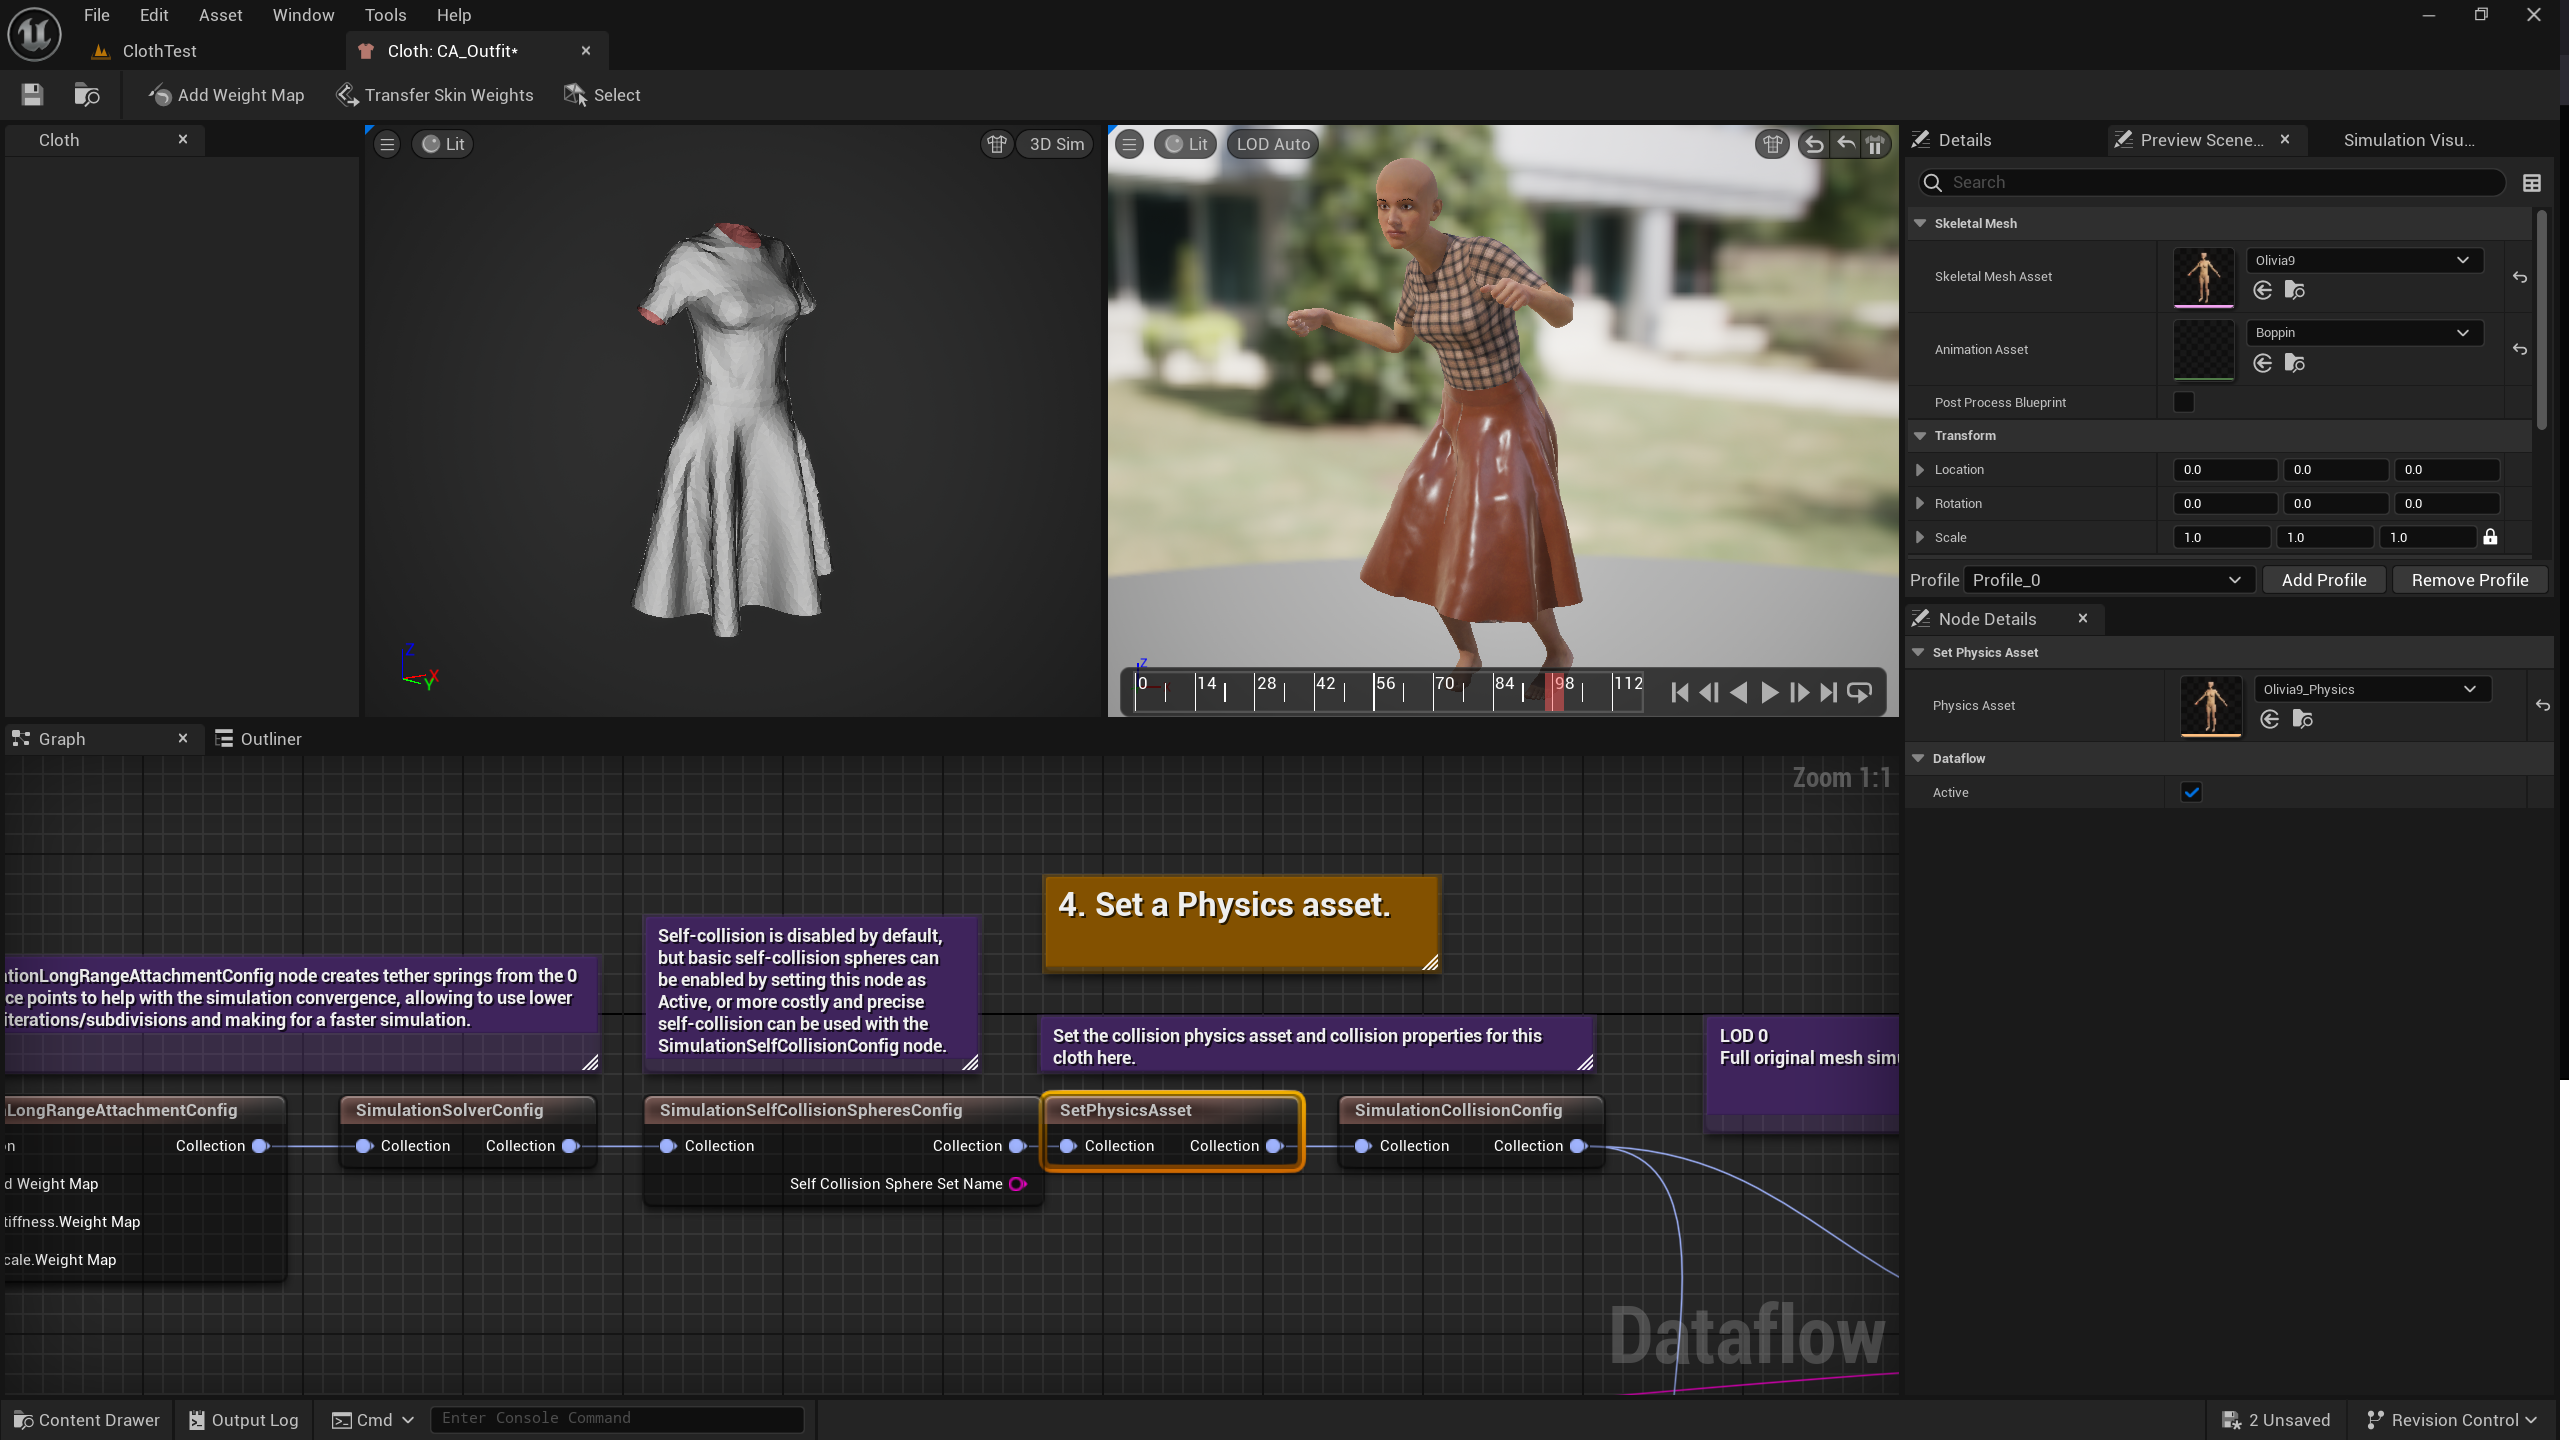
To see if the whole process works, specify your character mesh in the Preview Scene tab, along with an animation and press play to see a preview of the cloth simulation. You can toggle this on and off in the mini viewport on the top right.
That’s it for the cloth asset.
Using our Cloth Asset
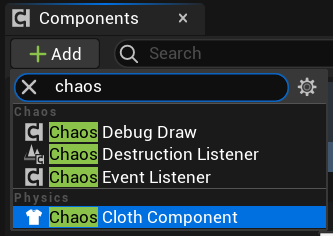
The easiest way to keep our figure and clothing combined is by making a new Blueprint, a simple Actor type will do. We’ll add a skeletal mesh to it, add our figure to that, then add a Chaos Cloth component and parent it to the Skeletal Mesh, then select our clothing asset. If we had multiple, we could provide several cloth components, say for a top and some pants.
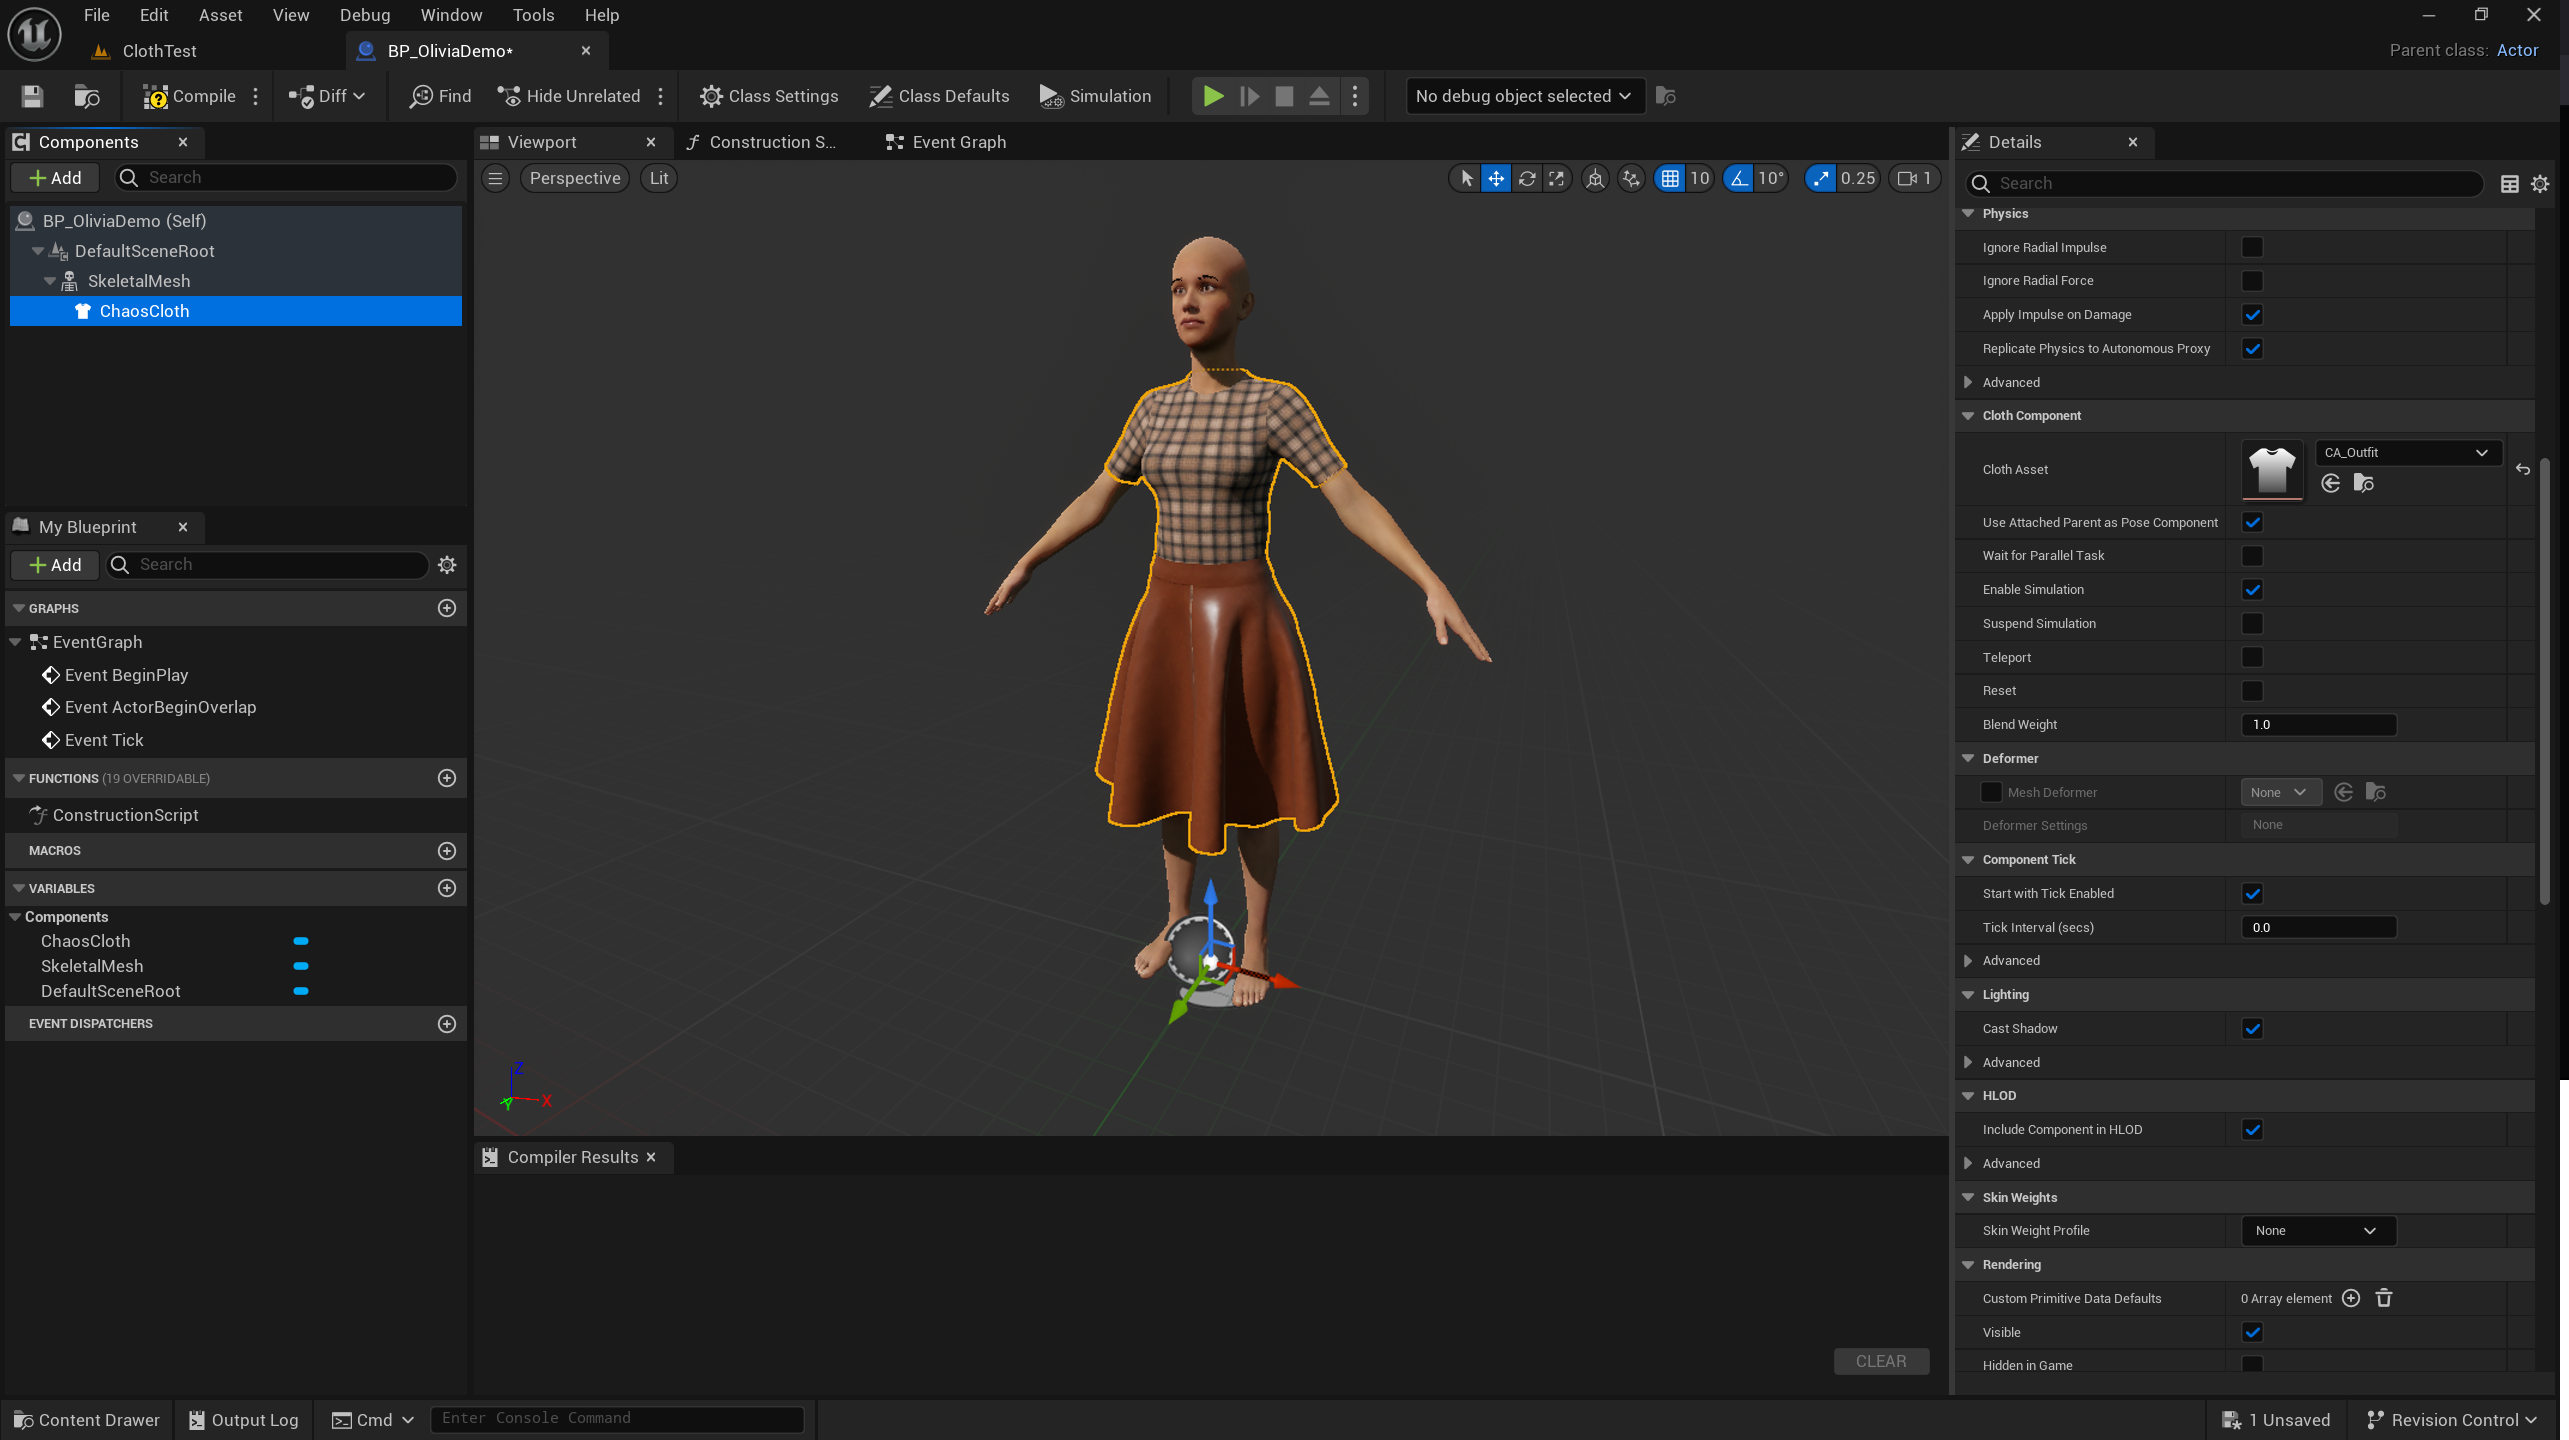
We can use this character as part of a Third Person Blueprint character too and have them walk around with cloth dynamics, although this may look rocky because it’s an expensive calculation. For live performance, larger collision shapes and a less dense cloth mesh is recommended.
Thankfully I only work with cinematics so I’m OK with expensive. To apply an animation, we can track our Blueprint on the sequencer, then target the skeletal mesh and apply an animation. Don’t forget a 5 second holding pose so the cloth can settle down. To see the live cloth dynamics, switch the to Simulate mode at the top of your viewport.
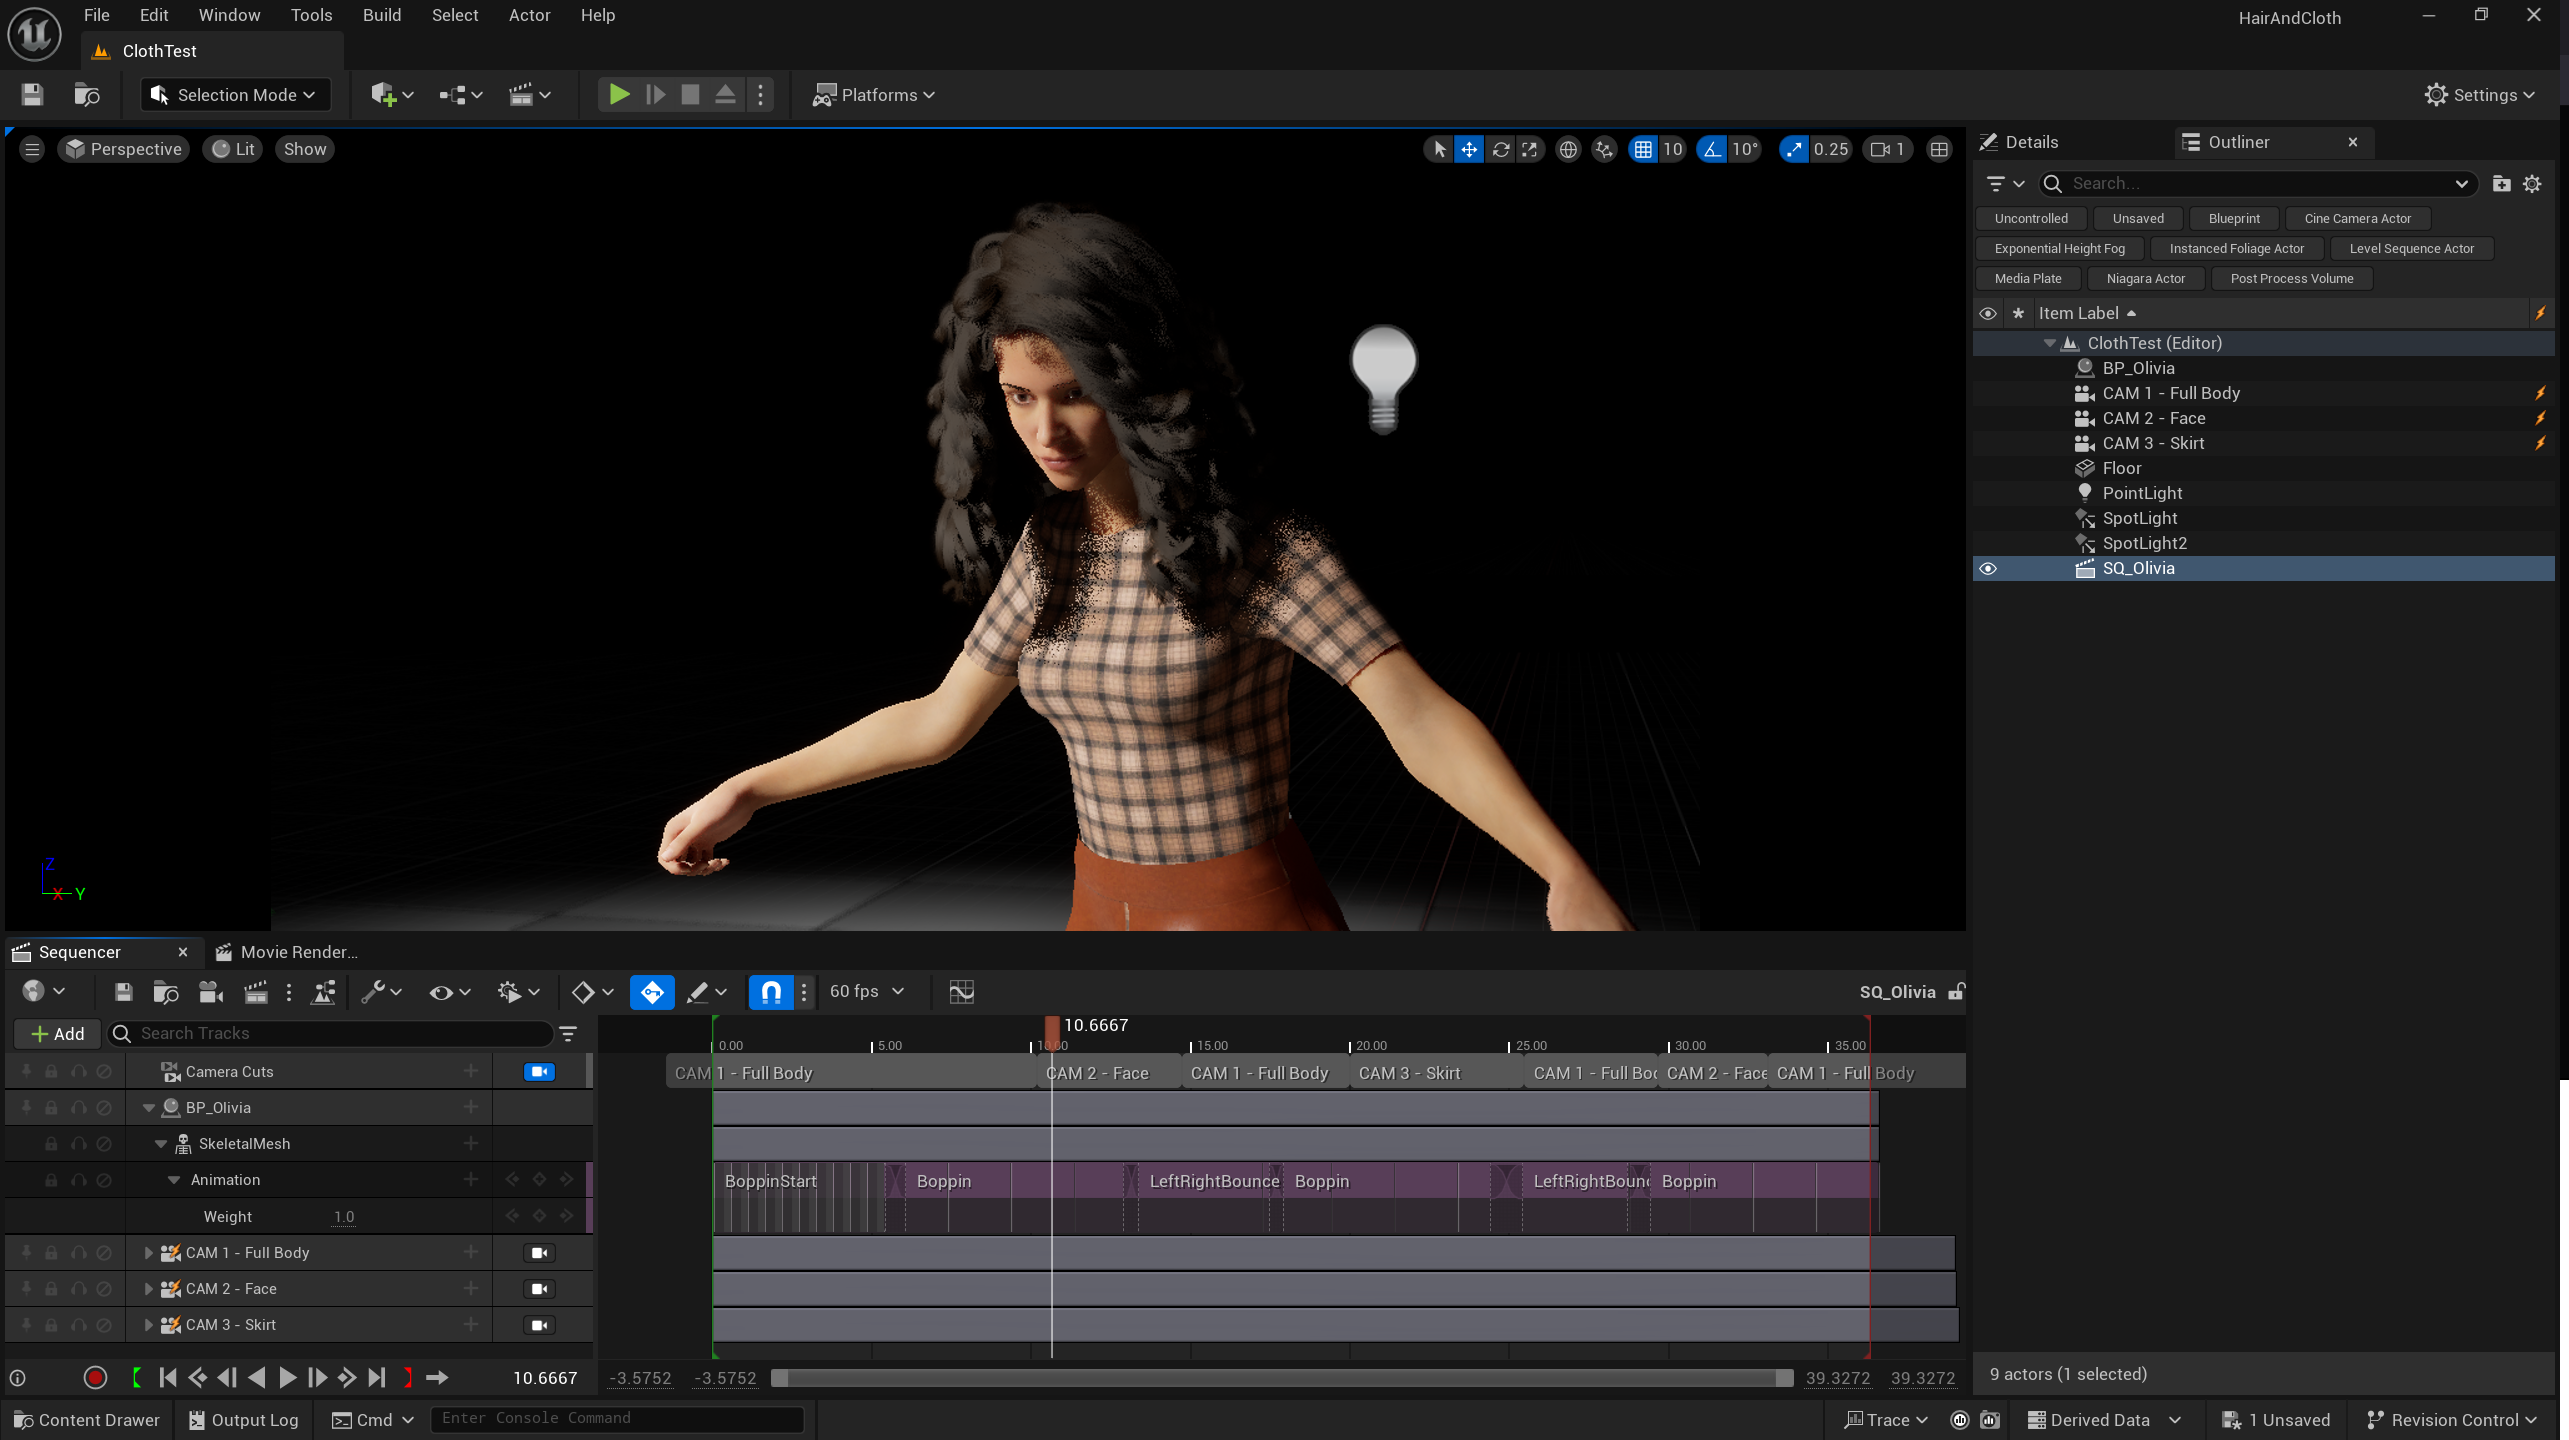
There’s no need to add any additional tricks: the moment we render it with MRQ the simulation is calculated. I was really surprised by that and had expected crazy things like a Chaos Cache Manager. This is an extremely slick implementation of cloth dynamics.
Closing Thoughts
I know this seems overwhelming, and I have a feeling the team will bring many improvements/changes to this workflow in future iterations of Unreal Engine. However, when you’ve done it a few times this is all laid out very intuitively.
One note about the USD vs OBJ workflow: the additional nodes in the Dataflow are designed to specify intricate cloth behaviour details, many of which can be set with specialised software like Marvelous Designer. USD is open enough to allow many of those cloth details to get transferred into UE so that cloth behaves the same in MD and UE, which is quite exciting. If we use OBJs, we need to set these details manually in the Dataflow graph. I’ve not had a chance to play around with those yet, just know that they are there.
Other than that, thanks to Tim Brakensiek from EPIC to write-up these instructions, and kudos to the whole team for implementing something this advanced for us to play with!