Here’s the solution to a rather tricky puzzle I’ve spent researching all day. Imagine you had a Blueprint that’s made up of Child Actor Components (potentially other blueprints with their own logic). How do we access parameters on those children, and how do we do this via Sequencer or other blueprint logic? Quite the task indeed!
Let me explain a bit about this workflow and the solution that worked for me.
Child Actor Components vs Actor Instances
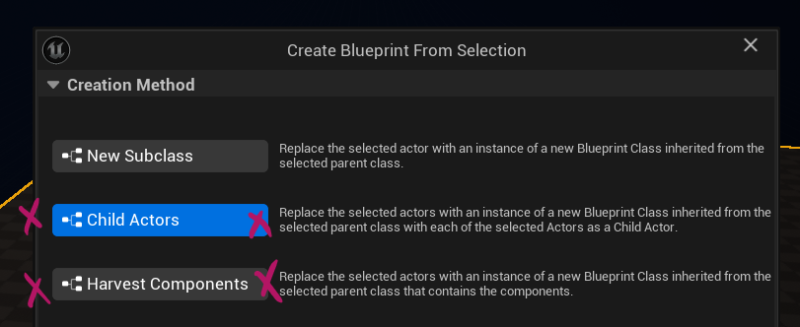
When you convert a selection of objects into a blueprint, you get two choices:
- harvest components (much easier)
- create Child Actor Components (more complex)

While harvest components is the easier option, leaving the ability to access properties of children directly, it will strip out all existing logic that selected blueprints may have. Child Actors on the other hand attach all children in a more abstracted way, encapsulating existing logic and leaving it intact, but hiding away the properties of the actual components. It’s also more expensive to use at scale.
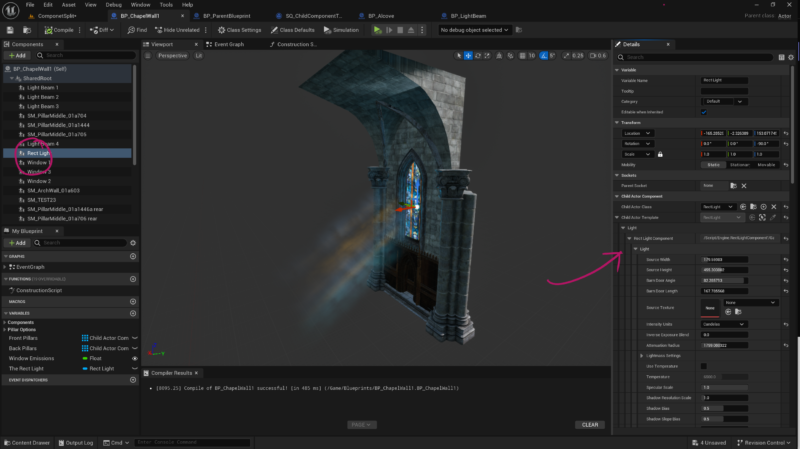
Take this example of a simple Rect Light that’s been refactored as a Child Actor Component: to access its light intensity, you’ll have to dig 4 levels deep. Materials on static meshes can’t even be accessed via the UI at all. This makes it tricky to change via blueprint code and/or sequencer. Let’s take a look at how to do that next.

Referencing Child Actor Components
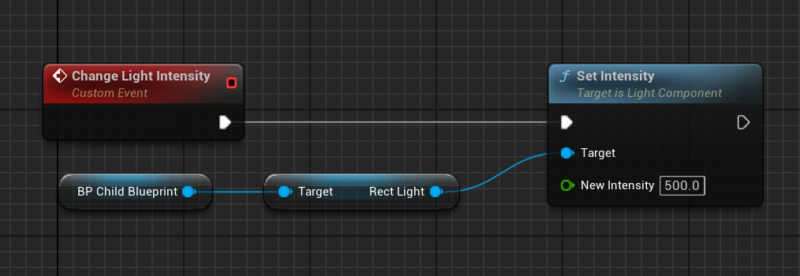
Let’s say we have a Rect Light that’s part of a Child Blueprint, which in turn is part of my Parent Blueprint. In the latter, I’d like to access that Rect Light’s intensity. First I’ll grab a reference to the Child Blueprint, then cast it via the Get Child Actor node. That last step is important, because without it the cast will fail as it’s not the actual object, just a reference. I’ll also store the result as a variable for easy access later. I’ll do all this in the construction script of my Parent Blueprint.

Next we’ll build a custom event in the Parent Blueprint that gets called when we want a chance to be executed. This isn’t strictly necessary, but makes it a little easier to access later. In our case it’ll be a simple intensity change, but anything goes here. You can access any component or trigger any logic on the child blueprint this way.

This custom event can now be called from other parts of your project by referencing this parent blueprint, which in turn executes the change on the child actor.
Triggering our event from Sequencer
Taking this a step further, let’s track our Parent Blueprint on a Level Sequence. We’ll also add an Events Track with a trigger keyframe so we can utilise the Sequencer Blueprint to call the custom event from above on a particular frame. To get access to that, set a keyframe on the Events Track then double-click the keyframe itself and the so called Director Blueprint will open up.

Technically this creates a custom event called SequenceEvent, but because that’s a tad nondescript, feel free to rename it into something more meaningful (like Change Light in my case). From here we can trigger events like usual, for example our custom event from earlier.

To get the reference to our Parent Blueprint, drag it in from the sequencer itself, then use the Get Bound Actor node. This will deliver the actual object, but to access its properties we need to cast it once again, this time to our parent blueprint. From here, we can either call our previous custom event (see above), or access the child blueprint directly and make changes that way (see below).

If you want to trigger another change, set another keyframe and setup different logic. Alternatively, if you’d like to trigger the same logic again, just copy the keyframe to a different spot in sequencer and it’ll run again.
Preview in Simulation Mode
Notice that when you play the sequence back, your change isn’t going to happen in the viewport. While sad, your change will appear when you render the sequence. To preview it, switch the UE Viewport into Simulation Mode and press play to see your change.
That’s it! I hope this will help our heads smoke a little less next time we have to set this up 🙂