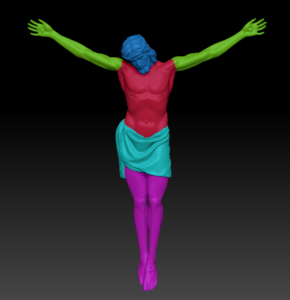
Complex figures like humans are best UV unwrapped when they’re split into multiple parts, like arms, legs, head and so forth. When we’re working with Genesis or Reallusion figures, the heavy lifting has already been done for us, but when it comes to creating these splits from scratch it can be tricky. Here’s a way to do this with ZBrush, using masks and polypaint information.

In principle we
- mask off areas we’d like to unwrap separately
- turn each mask into polypaint information
- turn each polypaint section into a polygroup
- use these sections with UV Master
Creating Polypaint sections
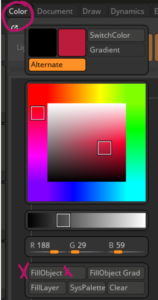
To paint in an area on our mesh, we can use the masking brush (CRTL) to paint an area like the arms or legs. To store this for later use we can flood fill this information as a polypaint section (that’s vertex paint information, so no textures are needed). When an area is painted in, we invert the mask so that everything but the painted area is showing. Next we flood fill this area with a colour of our choice (under Color – Fill Object.

Repeat this procedure for all parts of the mesh.
Creating Polygroups
Polypaint is no good for UV Master, but Polygroups are, so let’s convert what we have to Polygroups (that’s just another name for vertex or face groups). You’ll find that feature under Tool – Polygroups – From Polypaint.

Make sure to set the PTolerance slider all the way to the left, this assures that all colour hues from the polypainting are turned into groups. To see your Polygroups, click on “Line Fill PolyF” (fun fact: Pixologic never won an award for “best UI/UX design – I wonder why).
UV Mapping from Polygroups
Let’s use UV Master to let ZBrush create separate unwrapped UV islands from our model. Select “Polygroups” and enable the control painting option with “attract from ambient occlusion”, although that’s optional (it’ll ask ZBrush to put seams into shadowy areas with 10% accuracy). This can take a while, depending on the density of your mesh. Let it run, even if ZBrush appears to be crashing.
To see the handy work it’s done, head over to Tool – UV Map and click on Morph UVs. This will show how each island has been unwrapped. Change the control painting as necessary and let it unwrap again, or export your mesh with these UVs.
That’s it! Have fun polypainting and UV unwrapping!