Jay is a medical miracle known as Super Survivor. He runs several YouTube channels and websites, and he's also live on Twitch sometimes. To support him on his mission to make the world a better place, you can support him on Patreon or buy him a coffee.
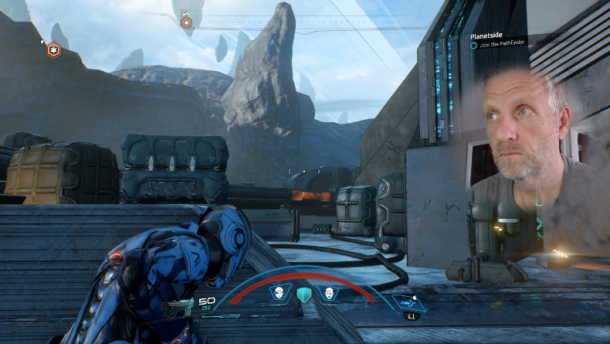
I like the way my PlayStation 4 adds a soft round cutout mask to the PlayStation Camera Feed when streaming gameplay. I wondered how I could best recreate this effect in OBS Studio for a consistent experience, no matter which device I decide to stream from.
Here’s how I did it, with a little help from Photoshop – feel free to use the resulting asset without any need for further fiddling.
You can download the mask further down (anchor link).
I’ve recently found out that there IS indeed a way to show a list of all DAZ Studio Keyboard Shortcuts. Sadly this functionality is not built in to DAZ Studio (as of 4.11 as far as I know), but we can convince the app to use the following script to show us a handy list. …
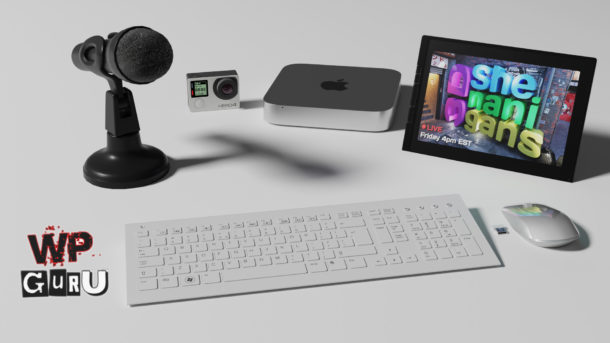
From time to time I get asked what hardware and GPU I’m using for my 3D adventures, including video games. Rather than typing it out every time, I thought I’d make a handy post that I can refer interested parties to, and update as my configuration changes.
This is that post.
It may contain more information than necessary, but I thought I’d add it all here, including a bit of history on how this setup came to be and what it cost. I keep this page updated as my configuration and workflow changes.
TL;DR
These are the main systems that I use for work and play. They run the Adobe Creative Cloud, games, 3D apps. Most systems are CAT-5 wired with a 1000Mbps connection.
Main Workstation / Presentation PC
HP Z840 Workstation
2x Xeon E5-2670 CPUs (48 threads)
48GB of DDR-4 RAM
2x RTX 2080 GPUs
Streaming PC
HP Z600 Workstation (Rev B)
2x Xeon x5675 CPUs (24 threads)
24GB of DDR-3 RAM
RTX 3060 GPU
Elgato HD60 Pro HDMI capture card
Render Node 1
HP Z800 Workstation
2x Xeon x5675 CPUs at 3.07 GHz (24 threads)
48GB of DDR-3 RAM
2x GTX 970 GPUs
Render Node 2
HP Z600 Workstation (Rev A)
2x Xeon x5560 – 2.80 GHz CPUs (16 threads)
20 GB of DDR3 RAM
GTX 970 GPU
Email / Coding / Chat PC
Apple MacMini 2012 Server Edition
Intel Core i7CPU at 2.3 GHz
16GB of DDR-3 RAM
Intel HD 4000 GPU with 1.5GB of RAM
The Longer Story
Most visitors are probably content with the info above. However, if you’re interested in how all this equipment came to be, and how I’m using it in my home/office, read on below. I’ll tell you how I acquired most of the parts and how I’ve built them from older technology that still packs quite a punch.
I’m a big fan of Anders Enger Jensen. He’s a retro composer from Norway, I’m proud to support him on Patreon, and I love using his music for incidental underlays and many other video projects (with his very kind permission of course). His latest compilation album is available on Sportif – check it out and …
Have you seen those fancy graphic overlays that animate over gaming live streams? They’re great for audience interactions, and when I did my research on how to create those, I came across Streamlabs.com. That’s a service most successful streamers seem to use these days. There are two ways to set this up: either download a …
OBS Studio can start recording automatically when we hit the Start Streaming button. The option to switch this on is hiding under Settings – General – Output. The destination and file format for the resulting video file can be set under Settings – Output.
No matter how hard I try, I just never remember where the Symmetry option is hiding in ZBrush. At least I remember this website, so when I search here next time, this post should come up. Which tells us that Symmetry in ZBrush is in the Transform Menu. Here’s a link to the official documentation, …
In this episode I’ll show you how to create a moving Zoom Effect in Photoshop, using the Radial Blur Filter. I’ll also explain the use of Smart Objects and how to blend the original image with the blurred version using a Layer Mask. I’ve used this effect to create the thumbnail for my Vertigo Shot …
Minor tweaks on themes for versluis.com and The WP Guru sites. Updates are live on GitHub: https://github.com/versluis/The-WP-Guru-2013 https://github.com/versluis/Versluis-TwentyThirteen
In this episode I’ll show you how to create a Dolly Zoom animation in DAZ Studio. That’s a camera trick made famous with Alfred Hitchcock’s movie VERTIGO, hence it’s often called a Vertigo Shot or Jaws Shot (because Steven Spielberg has used it for great effect in Jaws). In Part 1 I’ve explained how the …
In this episode I’ll show you how to create a Dolly Zoom animation in DAZ Studio. That’s a camera trick made famous with Alfred Hitchcock’s movie VERTIGO, hence it’s often called a Vertigo Shot or Jaws Shot (because Steven Spielberg has used it for great effect in Jaws). In this part I’ll explain how the …
I recently had a clip in which the audio was only present on a single channel. Trying to edit that in iMovie proved impossible, because iMovie doesn’t have a way to deal with single tracks of audio. So I thought, I’m sure Premiere can do that. The question was… how? It had occurred to me …
In this episode I’ll show you how to use my new lighting product SOUL REFLECTIONS – Vol. 1. I’ve had so much fun exploring the eye reflections I’ve explained in my previous two videos, importing several interesting shapes and turning them into reflective surfaces. SOUL REFLECTIONS is the result of my endeavours. I’ve compiled presets …
In this episode I’ll show you how to create a ring flash in DAZ Studio so we can use it to create catchy reflections in our characters’ eyes. Full credit for this method goes to s1rmunchalot, who very kindly left a comment on my previous video about creating such a ring flash from a torus …
In this episode I’ll show you how to use the bookmarking feature in Storyist. I’ll also explain how to use comments and where to find a list of them so you can see them all in one place. https://www.versluis.com/wp-content/uploads/2018/09/Storyist-18-Comments.mp3 Podcast: Download (Duration: 12:27 — 11.4MB)
In this episode I’ll show you how to create reflections in the eyes of a character in DAZ Studio. I’ll explain why these things happen in reality and how we can re-create them in the software. I will show you this principle with three types of lighting: using IBL, using parametric lights, and using an …
More like a re-discovery, Yellowjacket’s 1992 live album entitled LIVE WIRES is a timeless classic. I remember when my friend Oliver bought the CD back in the early nineties. It was like dynamite in our Walkmen. Except for a couple of inevitable duff songs that seem to find their way into the best album, 7 …
Even my ageing version of Premiere Pro CS 5.5 has multi-camera editing capabilities built in. And even my ageing Mac Mini from 2012 can cope with full HD clips during those edits.
It’s a slightly mysterious process, and until very recently I didn’t quite know how to do it, so there are my notes. This workflow is also helpful if you a have single camera feed and want to switch live (vision mixer style) to zoomed-in versions of the same footage.
In short, we need to
drag all camera clips into a timeline (all on top of each other)
sync all clips in this timeline (select them all, then right-click and choose “synchronize”)
create a new sequence from that sequence
enable multi camera on that clip
open the multi camera monitor, press play and switch live between cameras, creating edits on the fly
Here’s what I’ve been up to over the last 30 days. It’s been highly productive, even though what I have achieved was not quite in line with what I had set out to do. It’s always interesting for me to see how unpredictable creativity is. SUPER SURVIVOR – Season 1 (Podcast) I’ve turned my second …
In this episode I will (try to) explain the concept of Story Sheets to you. Those are writing aides, akin to writing bibles and index cards. Think of Story Sheets as a supercharged version of a post-it note. They let you define relatively vague “things” like plot points, characters, settings, scenes, character development points and …
In this episode I’ll show you how Storyist lets you import images and how you can use them in your project. Images are not linked and are stored with your project, so feel free to delete the original. Storyist can use images in-line with your text, or they can be part of the storyboard view …
In this episode I’ll show you how to install 3D Content with Install Manager into another directory of your choice. By default, Install Manager will use a folder called “My DAZ 3D Library”, but sometimes you may need a second directory to install content in. For example, to keep pre-release files separate from “release versions”, …
In this episode I’ll show you some of the shortcuts I find useful when using Storyist. I’ll show you how to navigate words, paragraphs and whole lines from the keyboard, and I’ll also explain a couple of tab key shortcuts. Lastly, I’ll show you how to access a full list of shortcuts that are supported …
In this episode I’ll show you how parent objects to one another, and how to create groups, and the implications either of these actions has on your scene. I’ll also explain the Null object and when/how to use it. Understanding these concepts means you’ll be able to build scenes more efficiently: hierarchies let you move …
In this screencast I’ll show you how to customise the headers and footers of your document. The principle is the same for either. In particular, we’ll look into aligning the page numbers in the footer: off numbers to the left, and even numbers to the right – just like some books do. Storyist can help …
In this episode I’ll show you how to change the location of the Pivot Point in DAZ Studio. It’s the point at which the 3D manipulator gizmo shows up and from where objects are translated and rotated. Blender calls this the “origin point”. DAZ Studio uses the Joint Editor to manipulate this point. While I’m …
Another busy month draws to a close. Let’s see if I can remember all the exciting stuff I’ve been able to create, which consisted mainly of video content.
Blender Logo Creation – Mini Series
I’ve created a 5-part mini series on how to take a rasterised image, turn it into an extruded 3D object in Blender and use it to create a snazzy logo.
I’ve used this technique to create thumbnails for two of my recent projects (the DAZ Studio 101 series and my WordPress podcast). There are many steps to the whole process and I thought I’d record how I did it. I also created thumbnails for the videos in the series using the same approach, showing bit by bit what each video is about. Like this one:
In this episode I’ll show you how to customise the print-ready PDF we’ve created in the previous video. When Storyist formats a PDF with templates, it create intermediary files that we can tap into and further refine the output to make it look exactly as we want our book to look. https://www.versluis.com/wp-content/uploads/2018/09/Storyist-13-PDF-2-v2.mp3 Podcast: Download (Duration: …
View this post on Instagram A post shared by Julie Rothenberg MS, RD, LDN (@julienergynutrition) I found this post by my wonderful nutritionist Julie Rothenberg in Instagram this month. It struck a chord in me about awareness and helped me through a day on which I felt angry and aggravated. I really didn’t want to …
In this final episode of our serves I’ll show you how to create and apply a Density Map for use in Blender’s Particle Emitter. This will allow us to specify where objects are replicated and how may we want at which point. I’ll also explain how to invert the map. I will touch on how …