Latest Articles

The navigation at the bottom lets you see older posts

How to preview HD Morphs in DAZ Studio

Michaels

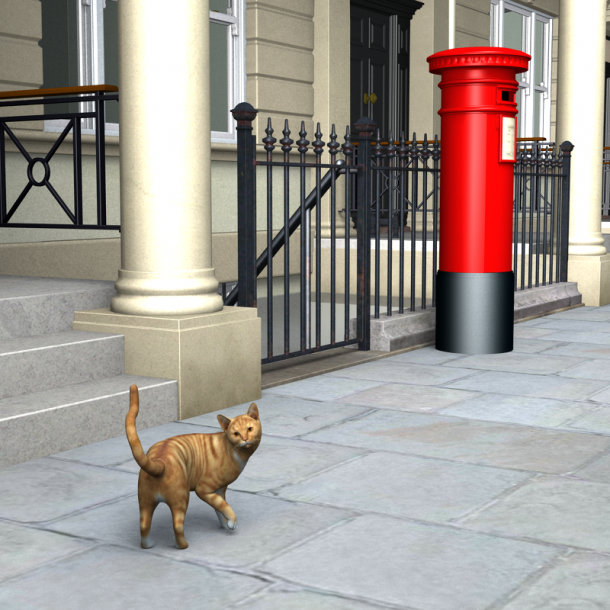
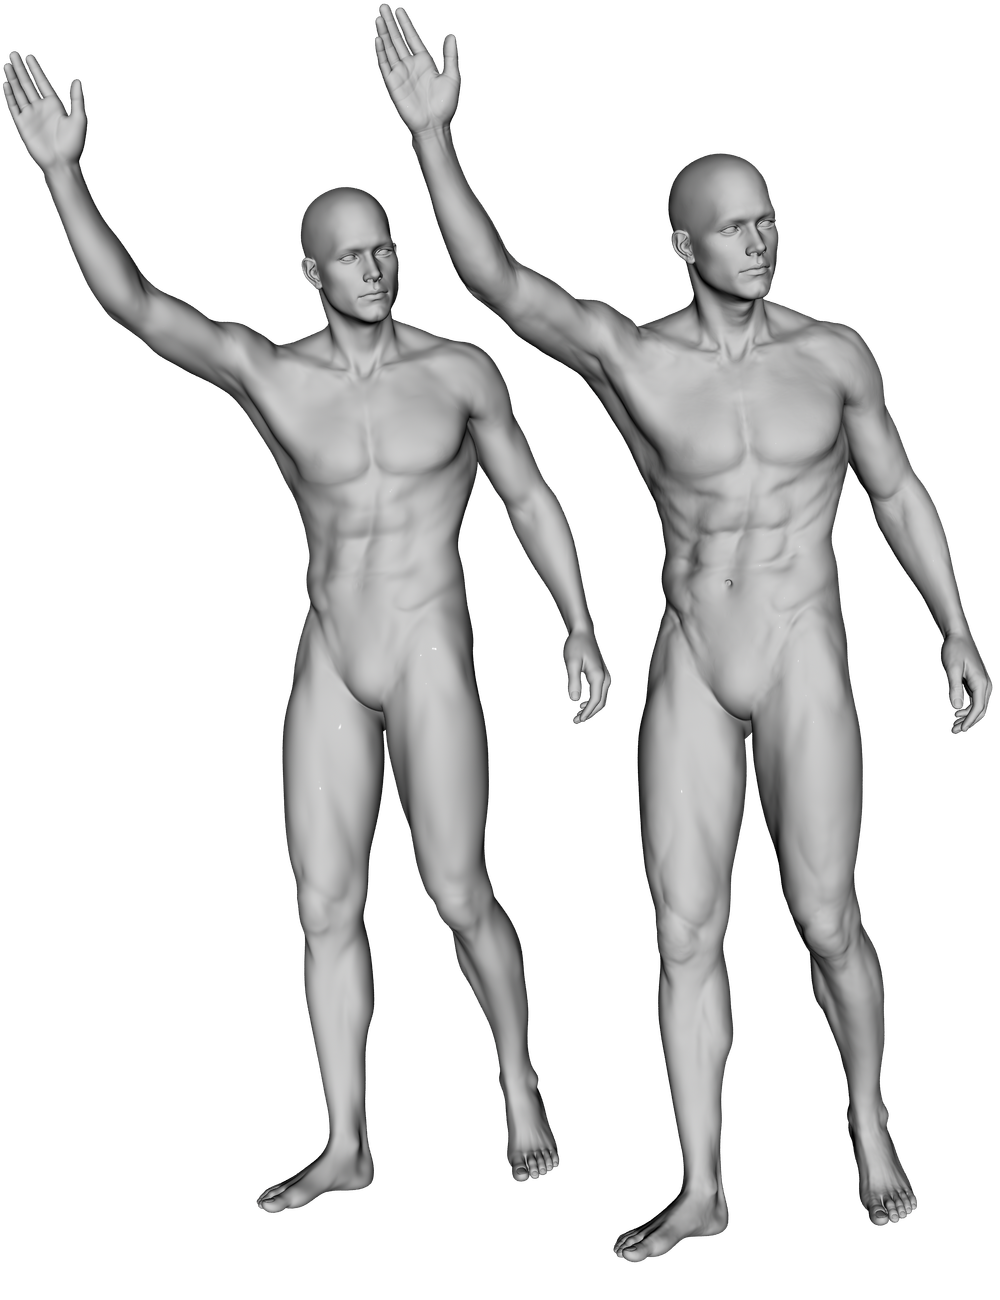
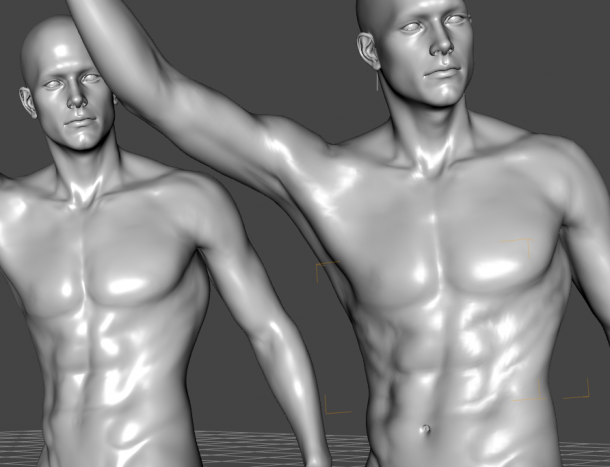
In the above picture we have a render of Michael 6, the standard version on the left and the HD version on the right. Zooming in closer we can see that his abs and knees for example have a lot more detail – as we’d expect from an HD version of a model.

Comparing the two Michaels in our viewport instead of the render however, we can barely make out a difference. Both figures look nearly identical (except for the belly button indentation perhaps).


Screen Shot 2015-07-07 at 12.59.33

So why is that, and how can we preview those HD details before we render them?

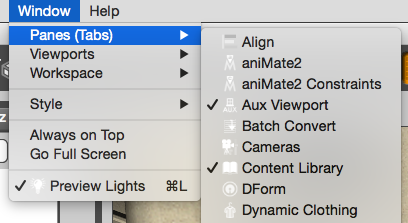
The secret lies in our viewport’s subdivision levels.

Read more

Where is Save For Web in Photoshop CC 2015

The swanky new slash screen isn’t the only thing that’s changed in Photoshop CC 2015. One of those functions that I use probably THE MOST in Photoshop is File – Save For Web. It’s been around for ages and means that you can quickly create a flattened JPG or PNG of your otherwise well-stacked and complicated …

Read more

How to export a single frame from your timeline in Adobe Premiere Pro

There’s an extremely handy shortcut that allows us to export single frames from the playhead’s current position in Premiere’s timeline. It’s not available via a menu command, it’s not particularly advertised, and it saves having to go via the File – Media – Export option, potentially downsizing the original footage. Take a look at your …

Read more

Cardozo Textures for Peplum Dress – now available at Hivewire3D

Take Stephanie’s Peplum Dress and Blossom Shoes for a walk on the town with our brand new Cardozo Textures: 10 brand new outfits for the dress and the shoes, all carefully crafted with love from Miami Beach!

This gives you a total of 40 Material Presets for both DAZ Studio and Poser (via DSON Importer). This is our second release on Hivewire3D, and something tells me it ain’t gonna to be the last 🙂

HW-Main-Promo

I’ve rendered the promo shots using Stephanie 6 (it is her dress after all, even though it fits all the Genesis 2 Females) and Stonemason’s fantastic Streets of the Mediterranean.

In the background you’ll find 3D Universe’s Jason and Amy walking up the stairs, the Millennium Cat licking his paws and the Toon Mouse fleeing in panic (and presenting the shoe compilation too). The red bike is courtesy of Carrara.

This slideshow requires JavaScript.

All these things and the Peplum Dress are available from DAZ 3D.
In this article I’ll explain how to get the most out of our texture pack.

Read more

Breakwater Textures for Frilly Triangle Bikini – now available at Hivewire3D

Promo-1

Summer Time means Bikini Time – unless you live in Miami Beach, where it’s Bikini Time all the time. May I present with pleasure a brand new texture set from Team V:

Breakwater Textures adds 10 new Material Presets for the beautiful Frilly Triangle Bikini by Nikisatez. Take your Genesis 2 ladies out for a dip in the lake or a stroll at the beach and give the Frilly Triangle Bikini a whole new spin (watch out for little green monsters though).

The set is now available from Hivewire3D.

This slideshow requires JavaScript.

All the above were rendered in DAZ Studio, but separate Poser Material Presets have been carefully crafted from scratch. The backdrop was made in Carrara using HowieFarke’s beautiful Secret Lake scene, and the little green critter is another 3D Universe classic called “Monsters in my Cupboard” (both available from DAZ).

Our models are Victoria 6 (left) and Lilith (right, and in single shots), featuring textures designed by my wife Julia. Right on!

Let’s see how to use those Breakwater Textures.

Read more

How to change the launch image in DAZ Studio

Did you know that you can change the splash screen / launch image that comes up when you start DAZ Studio? It’s nothing major of course, but just in case you find the default image too distracting you can make DAZ Studio launch with something more plain, as pictured above. Head over to Preferences – …

Read more

How to enable Hardware Acceleration in DAZ Studio

Are the viewport movements in DAZ Studio getting you down? Does it seemingly take forever to make a small camera adjustment, despite your decent hardware? Check if Hardware Acceleration is enabled – because it isn’t by default. They do this so that most hardware will work with DAZ Studio out of the box, but they don’t …

Read more

How to reduce the Depth-Of-Field frost effect in DAZ Studio

Something that’s always been bugging me is the “frost effect” that DAZ Studio introduces on renders with depth of field. The above picture is a perfect example of it. Where does it come from, and how can we avoid it? I’ve mentioned two approaches in an earlier article that discusses how to setup depth of …

Read more

How to render DAZ Studio RIB Files on another computer

I have previously described how to render DAZ Studio Scenes without DAZ Studio. This is done by rendering to a RIB File (RenderMan Interface Bytestream), using the standalone 3Delight Studio to create the final render. The procedure frees DAZ Studio up and allows you to work on your next scene without having to wait for the render to finish.

I generally use Xender for PC for my file transfer needs, but I’ve been looking for ways to transfer such RIB files to another computer which does not have the content or even DAZ Studio installed, and I think I’ve found another one!

When used as described in my previous article, DAZ Studio creates a RIB file that references temporary files as well files on the local system. Neither of those can be used on a different computer because they most certainly don’t exist. This means your render will likely be missing a few textures.

There’s a handy command line tool that will collate all those files needed to render the image. The drawback is that – depending on the size of your scene – this may result in a rather large file (1GB or more). However the approach is great if you’d like to render that super long animation for several weeks without blocking your regular office computer.

Here’s how to do it.

Read more

How to batch render RIB Files on your Mac

If you’ve read my previous article about rendering DAZ Studio files without DAZ Studio, you already know that I’m big fan of batch rendering my images. For this I mainly use the excellent Batch Render Script by Draagonstorm. It allows me to queue up several scenes, and while I do something else, DAZ Studio will load up one after the other and render like a champ.

Windows users have a special treat that can have the same script create a .bat file, allowing the 3Delight standalone renderer to work on a batch of files without using DAZ Studio. Mac users don’t have such luxuries, and will still “block” DAZ Studio until all renders in the batch have finished.

I have good news: for the hackers among us, we can create such a batch queue on the Mac manually, using a simple Shell Script. In this article I’ll show you how to do it. Some Mac/Linux command line experience is necessary to follow along.

Read more

How to save Layer Effects as Style Presets in Photoshop

HW-Promo6

To apply a carefully crafted Layer Effect in Photoshop to more than one layer or group, we can save it to the Styles Swatch for easy access later. It’s that little palette I never quite take seriously – mainly because it’s impossible to decipher which effect does what from the tiny preview icons.

Nevertheless, the styles palette is a handy tool to bring back such effects in other documents. Great for things we use on a regular basis. In the above image for example, the Layer Effect is the white border around each small inset image, as well as the drop shadow. Next time I create such a collage I may want to bring the same effect back with a single click. I can do that by using a style.

Here’s how to save a Layer Effect as a Style in Photoshop.

Read more

How to render a multi-camera animation in DAZ Studio

When you’re rendering a multi-camera animation, chances are you want to change shots from one camera to another. This means that you have to render your sequence from all camera angles and then employ an editing application to stitch your shots together.

There are several drawbacks to this approach: for one, a lot of render waste will accumulate for the images you don’t want to include in the final animation. Another is the time it takes to render an animation several times – as if one pass doesn’t take long enough already.

Thankfully there’s a free script that can help us render much more efficiently, and create the whole sequence in one pass: it’s called CamSeq by the amazing mCasual / Jaques (thanks, Jaques!)

Here’s how to use the script in DAZ Studio 4.8, step by step.

Read more

How to clear temporary files in Adobe Premiere Pro

Premiere writes a lot of temp files to various locations – the most obvious of those are saved at the same location as the current project, in a folder simply called Adobe Premiere Pro Preview Files. If you delete an old project, make sure to delete this folder too. But Premiere does create temporary files in …

Read more

How to create keyframe animations in DAZ Studio

Animation

DAZ Studio can handle two types of animation: aniMate aniBlocks, as well as traditional keyframe animations, much like many other 3D applications. The principle of animating objects is very simple, but as a scene becomes more complex you may find that additional tools (such as graphMate and keyMate) may be of help.

Here’s how it works:

  • select an object and set a keyframe (in the Timeline Tab)
  • move the timeline slider to a new position
  • move your object to a new position
  • and set another keyframe

When you move the timeline slider back and forth, DAZ Studio will calculate the movement between the two positions. All aspects of an object are animated, so with cameras it includes the depth of field and focal length, or with lights it would include the intensity. Sometimes you may need to tweak the keyframes, or set additional ones if the calculated motions aren’t working well.

Let’s see how this works with a primitive.

Read more

How to convert Layer Effects into actual layers in Photoshop

Layer Effects are great in Photoshop, but sometimes you may need to apply another such effect to a layer that already has Layer Effects applied. For example, a Pattern Overlay may require another Pattern Overlay. What can we do? It’s astonishingly simple really: we convert the Layer Effects to discreet layers. Here’s how to do it. …

Read more

How to avoid empty audio tracks in Premiere Pro

Why

Have you ever wondered why a source clip’s audio ends up at the very bottom of the timeline, even though you have several empty tracks above it? Well I have, and I was convinced there had to be some kind of setting responsible for this.

And there is: it has to do with the way a Sequence is setup when you first create it. Let me explain how this works and how to change such behaviour to avoid annoyances in the future.

Read more

How to reset User Preferences in Premiere Pro

The other day my copy of Adobe Premiere Pro started exhibiting strange behaviour: new projects opened with four timelines (three of which were always empty), audio never made it to the target track (only ever to track 6) – so I thought, perhaps I’ll reset my preferences. But how do we do that in Premiere? …

Read more

How to create Material Presets in DAZ Studio

Material Presets in DAZ Studio describe the surfaces of your 3D objects. A simple object may only have one material zone, but more complex objects can have several. These zones are also known as Shading Domains, which are setup when the object is created in a 3D modelling application.

Material Presets are closely related to Shaders, in fact they work with very similar concepts. The difference is that a Shader describes a single surface, whereas a Material Preset describes which Shader is applied to which part of an object, or more accurately, which Shading Domain shall be rendered with which Shader.

While you can apply a Shader to any object’s surface, you cannot necessarily apply any Material Preset to any object: Material Presets are object specific, whereas Shaders are not.

Let’s take a closer look at Material Presets in DAZ Studio, how to set them up and how to save them to your library.

Read more

How to create a 3Delight Shadow Catcher in DAZ Studio

Cat-Complete

Sometimes we need to render images that include shadows without objects to cast them on. In multi-pass rendering for example, where we may have a background and would like to render a figure separately, the figure’s shadows can only be cast if the background is rendered at the same time.

It’s easy to do by creating a plane primitive, have our character walk on that, and turn it transparent. However, if an object is transparent, then no shadows are cast upon it. So how do we solve this conniving conundrum?

With DAZ Studio’s Shadow Catcher function of course! Shadow Catcher is a node (or brick) in Shader Mixer, which will let us do just that: render shadows without the plane underneath it. Let’s see how we can set this up.

Read more

Club Monaco Textures for G2F Shoulder Dress – now available at Renderosity

Main-Promo

We’ve been hard at work on another texture set last week, and yesterday night it has been released: Club Monaco is now available – a set of 12 ravishing textures for the gorgeous G2F Shoulder Dress by kang1hyun (both available from Renderosity).

Club Monaco comes with 12 textures for the dress and 12 matching textures for the shoes.

I’m enjoying the team spirit Julia and I have going on these projects: she has a great eye for textures and patterns, and I’m the technical genius who makes it all work in DAZ Studio and Poser – not to mention creating those promo renders. It’s a bit addictive I don’t mind telling you 🙂

Read more

How to use the Interactive Preview Renderer in DAZ Studio

DAZ Studio 4.7 introduced an auxiliary viewport option with an Interactive Preview Render feature. This is a new panel that can be docked anywhere in your workspace (or free-floating if you prefer). You can find it under Window – Panes (Tabs) – Aux Viewport.

Screen Shot 2015-05-28 at 08.31.03

It looks and works much like the ordinary viewport in the middle, but at first glance it seems to have less options. Observe please: hover over the Aux Viewport to see the familiar camera selection and drawing style appear – they’re just hidden to clean up the interface when no mouse is in the vicinity. Very handy!

Read more

How to animate motion with Bezier Tweeners in Premiere Pro

Premiere-Tweener

Tired of linear animations in Premiere Pro? We’re in luck, because Premiere does support full control over ease-in and ease-out controls when you animate with keyframes. It’s just extremely clunky to use.

The process of rendering such frames in between is sometimes referred to as “tweening”. Let’s find out how to use it.

Read more

How to fix poke through in Poser with the Morphing Tool

Poser has an ingenious weapon against one of the biggest annoyances of 3D clothing: poke through. It’s caused by the clothing intersecting with another figure (the character, or another piece of clothing), causing undesirable effects. Take this example below: Roxy strikes a pose, and somehow her shirt and pants reveals her skin in several places. …

Read more

Filed under: Categories 3D Tagged as: Tags

How to use the Wardrobe Wizard in Poser

Wardrobe Wizard is a Python script that has been included with Poser since version 8. It allows us to convert clothing that was made for one particular figure and use it on another using a set of intricate calculations.

By default, Wardrobe Wizard will allow conversions between most Poser characters (Rex, Roxy, Simon, Sydney, etc) – but there are add-ons available that allow conversions to and from Genesis, Dawn, Victoria 4 and many others.

The script was not created by SmithMicro, but instead by PhilC who kindly sells these add-ons on his website http://philc.net (the link is also available from within Poser).

Let’s see how Wardrobe Wizard works in Poser Pro 2014.

For this example I’m using Rex’s Polo Shirt and Shorts. The items fit Rex nicely (right), but for Roxy they’re just a little bit too big (left). Just like in real like I guess 🙂

Screen Shot 2015-05-23 at 10.14.54

Read more

Filed under: Categories 3D Tagged as: Tags

How to create symmetric patterns in Marvelous Designer

Symmetric Paste

Most 3D apps usually have some kind of symmetry function that allows you to make a change on the right side of the model, and as if by magic it appears on the left hand side of the model too. It’s an important feature to have.

Marvelous Designer works a bit different because we don’t “model” objects as such. Instead we create 2D patterns. So how can we tell the app that a pattern is symmetric?

There are two tools that can help us accomplish this tricky task: Symmetric Paste and Unfold. Let’s examine both options.

Read more

How to open a layer as a new document in Photoshop

Sometimes it’s nice to extract a layer from an intricate Photoshop document and turn it into its own isolated document. Here’s how to do it: Select your layer and head over to Layer – Duplicate Layer… This will bring up a menu that lets you choose what you’d like to call it, and most importantly …

Read more

How to move the pivot point of an object in DAZ Studio

The pivot point is the location at which the universal manipulator gizmo is shown on a 3D object. From this point you can usually move the object, or rotate it around this very point. Blender calls this the “origin point”, while Carrara calls it the “hot point”. I’m not sure if DAZ Studio refers to it as anything in particular.

The location of the pivot point is of strategic importance, and it may not always be where you want it to be. New primitives and figures usually have it at the centre bottom, which works well for positioning the whole figure.

It can however be undesirable when you’re trying to rotate an object (like the cube below) around its centre. We’d need the pivot point to be at a different position to pull this off.

Screen Shot 2015-05-21 at 16.19.50

But how do we change its location in DAZ Studio? Let’s find out.

Read more

Murano Textures for Seana Dress – now available at Renderosity


Murano-Main-Promo

Inspired by our Bayside Bikini Textures, Julia has been busy last week and made some textures for the beautiful Seana Dress by Nikisatez. It is with great pleasure that I give you our second ever Rednerosity product: Murano Textures for Seana Dress!

The dress fits all Genesis 2 Female characters, such as Victoria 6, Stephanie 6, Aiko 6 and all the other Generation 6 figures. Take’em out for a stroll this summer with a pretty dress and 8 new additional textures from us 🙂

Read more